There are many ways to cook a steak, but most of them are terrible. Sous-vide falls victim to the false equivalence that uniform interior doneness makes a great steak. With sous-vide you get a bag containing a very wet and evenly cooked steak, a steak that will never get a great sear without undoing the uniform doneness that took an hour or two to achieve.
Reverse searing, which can be traced back to competition barbecuer Chris Finney in the early 2000s, doesn’t really resolve the time burden of sous-vide, but it fixes the wet issue. It’s a compromise between the uniform mediocrity of sous-vide and the crusts achieved by traditional searing. Most people seem to ruin the uniform doneness regardless, while trying to get a good sear on their steak. It’s no surprise; a good sear takes time. But if executed well, reverse searing can be fine, and I prefer it to sous-vide for achieving a sterile, perfunctorily seared steak. But why compromise? If you want a crust, don’t fear it—fight for it.
I’ll have my steak wet, medium-rare
is not a request that I entertain for guests. My steaks are crust-first. That’s not to say my steaks don’t have a pretty uniform interior doneness—they do. But a lack of uniform doneness isn’t a sign of a bad steak: a little bit of well-done banding close to the surface of a steak doesn’t actually negatively impact a steak overall. It’s character. A uniformly cooked steak is an easy badge of achievement for modernist bloggers and food bro braggarts to show off, but that’s all it is.
Old school steak houses generally use high-temperature broilers to sear their porterhouses. The surface unevenness due to their bone can make it particularly difficult to get a nice sear with other methods. But, there are evenly seared porterhouse pictures in this article, and I don’t have a steak house broiler (and before anyone asks: almost all broilers in home oven ranges lack the energy to properly sear a steak before the inside overcooks).
Every steak pictured in this article was cooked on the stove of an absolutely awful electric home range. It’s entirely possible to get a great sear on bone-in steaks at home, on a basic stove top. And my goal with this article is to empower you to do the same. You will not make steaks that try to live up to the offerings of steak houses, you will surpass them, by leaps and bounds.
The Beef
This recipe is written with rib steaks, strip steaks, and porterhouses in mind—steaks with good marbling that you can get in reasonably thick, inch-and-a-half or two-inch cuts (or thicker). Some of the ideas in this piece can translate to foods beyond steak. Some great cuts of beef are better served with other cooking methodologies. For example, the large fat cap on picanha can let you cruise to the appropriate doneness by cooking slowly on its fatty side. Thinner steaks could potentially do very well with almost constant flipping as they cook in a pan. Every steak cut is different; they’ll have different ideal donenesses and cooking methodologies. But rib steaks, strip steaks, and porterhouses are similar enough to be lumped together for this recipe.
My favorite steaks on the planet are from Flannery Beef and Lobel’s of New York, two butchers that ship five or six week-dry-aged meat all over the country, and I’ve been tremendously happy with all of the meat I’ve received from them.
Flannery’s specializes in California Holstein, a cattle breed normally relegated to dairying. Their Jorge-cut rib steak is their flagship steak, and it’s excellent. It’s cut from the chuck-side of the rib section, which yields the largest rib cap (the cap is generally considered the most flavorful part of the rib), but overall it’s a very fatty steak. Their standard California Reserve bone-in ribsteak is a bit more refined in terms of fattiness but at the cost of the rib cap size. I’ve really liked everything from their rib roasts to their mismatched filets mignon .
Lobel’s USDA Prime porterhouses and rib steaks are both absolutely phenomenal steaks, and I’ve never eaten a better steak than those. Lobel’s also has some incredible dry-aged American wagyu offerings.
I also like Snake River Farms for both their wet-aged and dry-aged American wagyu offerings, and I’ve specifically really enjoyed their American wagyu Black Grade end-cut New York strip steak, which is out of stock at the time of writing. Their deli-style hot dogs are great too, and their wet-aged beef and hot dogs come with backyard compostable packing materials. Their American wagyu ground beef may be good for something, but I haven't found it yet.
I only really go out to eat steaks socially, and I’d rather just save my money and get a steak from the likes of the aforementioned butchers. Generally, to save on shipping, I buy more than I’d want at a given time, and I freeze most of the meat in the vacuum packages that they come shipped in. Each steak serves as a dinner for two—not terrible for the best steaks I’ve ever had.
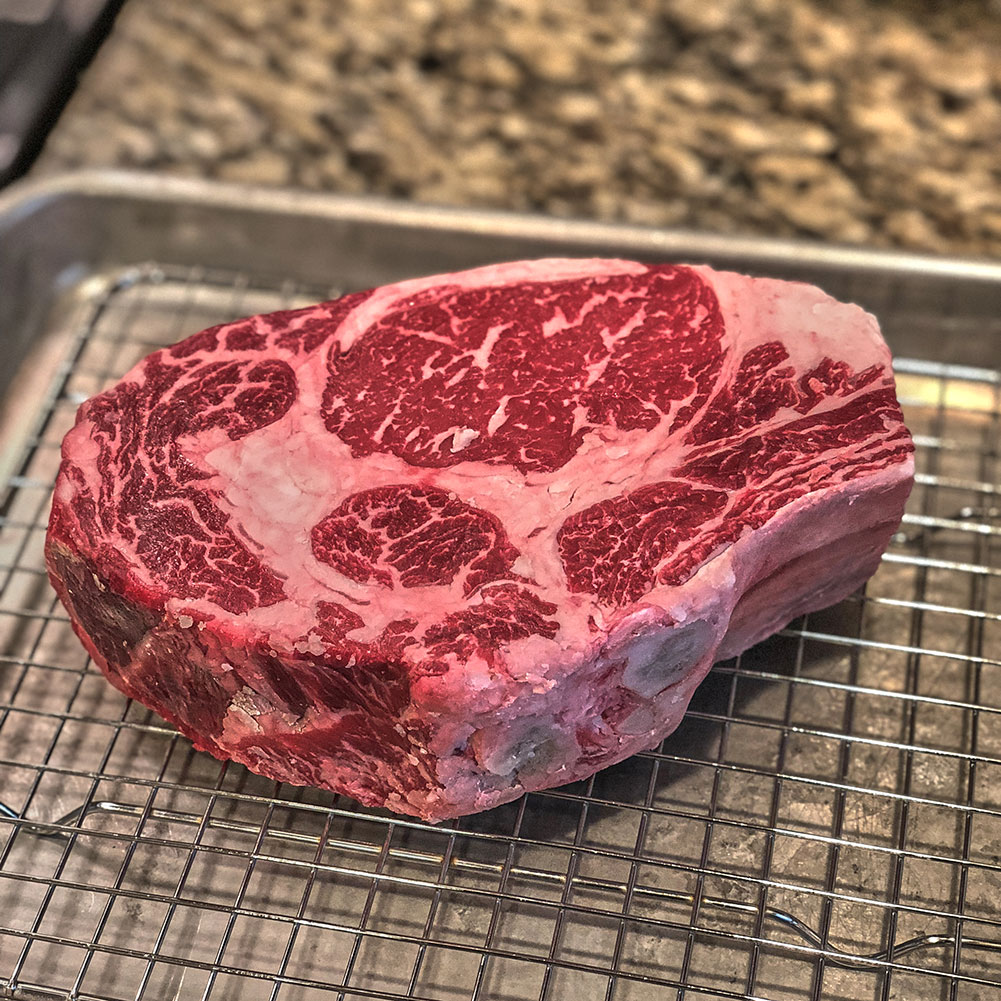
If you have a good local source of beef, that works too. For those with the luxury of choice, aim for a steak with a thickness of at least one-and-a-half inches with a good amount of marbling. Marbling means streaks of intramuscular fat, fat distributed throughout the meat, as opposed to intermuscular fat, large chunks of fat among lean meat.
Good marbling usually means beef from grain-fed or grass-fed and grain-finished cattle. Cattle that are exclusively grass-fed generally lack the fat for well-marbled steaks. Grain helps build fat, and hence, grain-finishing grass-fed meat can build up intense marbling.
My favorite beef tends to be grass-fed and grain-finished, though I couldn’t promise that grass-fed grain-finished beef tastes better than grain-fed beef—I’ve never done any tests like that. But there’s benefits to grass-feeding cattle beyond taste. Flannery Beef, Lobel’s, and Snake River Farms all carry grass-fed and grain-finished beef.
Fear and Loathing and Dry Brining
Do not wash your steak. Please avoid all temptation to toss your steak in the sink and scrub it. With soap, without—don’t do it. That goes for meats beyond your steaks: Do not wash meats that will be roasted or seared.
Washing meat does nothing to improve food safety, and by washing meat, you risk introducing contamination. If you must wash something, wash your hands, contribute something positive to the world, and stop unnecessarily wetting your meat.
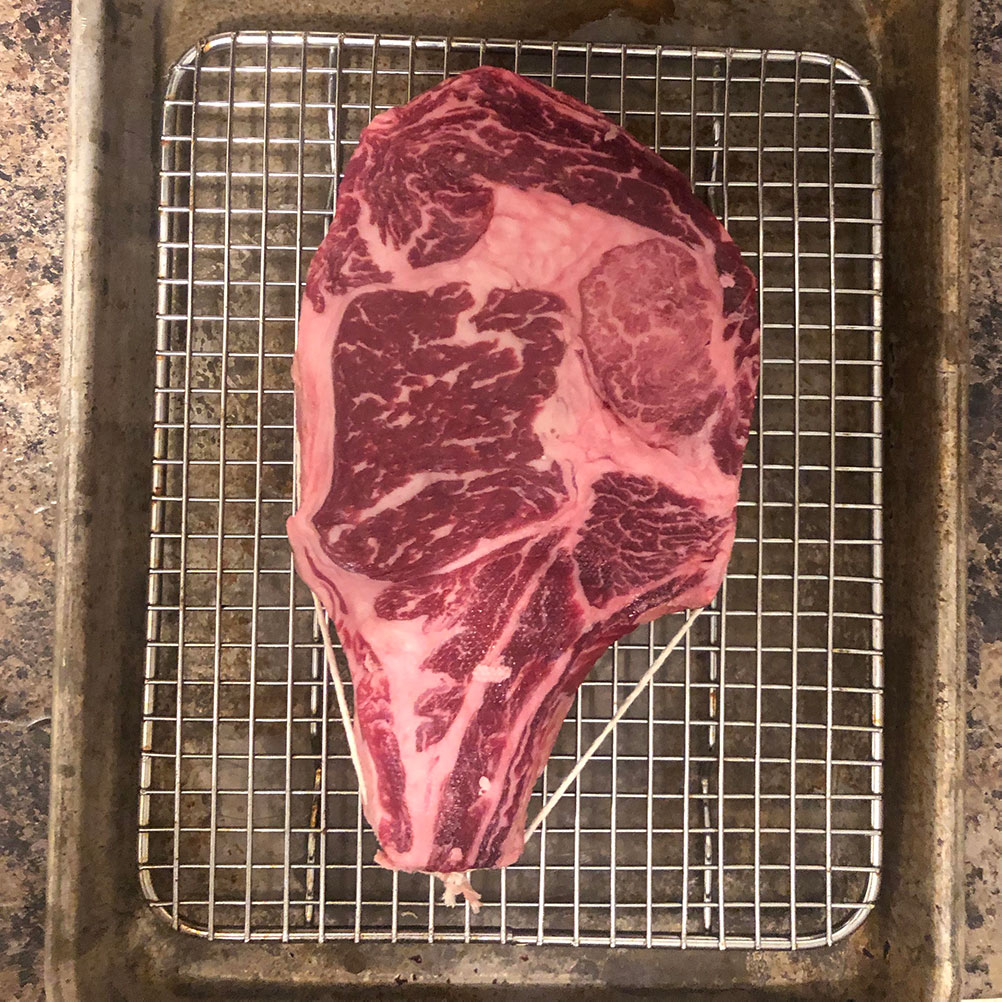
When you remove your steak from its packaging, pat the steak dry with a paper towel or a clean towel of some sort. Always start with a dry steak—the drier the surface of the steak, the easier it will be to sear. If there are thick portions of fat along the outside of the steak, you can make some incisions in the fat with a knife so that the fat can’t exert tension on the steak as it contracts more quickly than the protein. If there aren’t big chunks of fat, it’s not critical.
Wrap some butcher’s twine around the circumference of the steak, pull it tight, and tie it. I was never a Boy Scout, and so I haphazardly tie my knot. In a perfect world, I would have learned to do a butcher’s knot, but that’s not the world we’re in.
Ingredients and Equipment
Tying your steak with twine (also known as trussing) will help the steak keep its shape as it cooks, which, in turn, will promote good pan contact. If you have no twine, skipping the trussing step shouldn’t implode your steak making dreams; continue on and know that you can still make great steak with or without cotton twine.
Fat is not flavor: fat is potential flavor. And for a steak, salt unlocks that potential. Without salting, a steak has about as much flavor as a book on a tall shelf has power to hit you on the head. Unless you cower in fear every time you go near your bookshelf, you should have no expectation that unsalted fat alone will provide you any flavor.
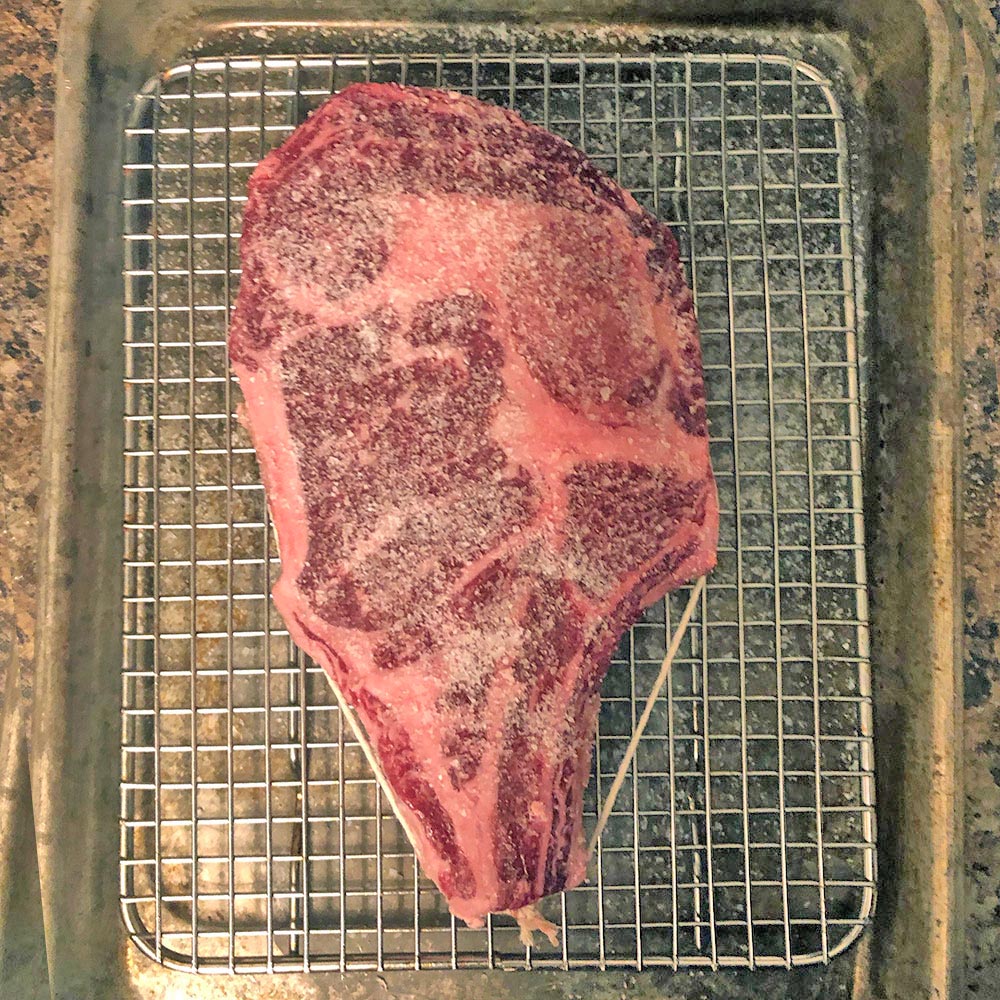
Salting meat and leaving it uncovered in the fridge for an extended period of time is critical. The technique serves to uniformly salt the interior of the meat and dry out the surface, which helps in developing a crust. The late chef Judy Rogers referred to the technique as dry brining
and popularized it with her famous roasted chicken at Zuni Café. And in addition to steaks, you also ought to be dry brining your poultry.
Salt with the salt you have, but if you have a choice between kosher salts, always go with Diamond Crystal over Morton: there’s a significant difference in saltiness and Diamond Crystal Kosher Salt is significantly less salty for the same volume of Morton Kosher Salt, and most recipes are written with Diamond Crystal in mind. Salt your steak generously. The amount of salt that you should use depends on the thickness of the steak, the salt itself, and your tastes. The amount shown below is specifically for a thick steak salted with Diamond Crystal Kosher Salt.
The salt will almost immediately start drawing moisture out of the meat, but eventually the moisture will return to the meat, migrating to the interior of the steak as the surface dries out. Water takes a lot of energy to evaporate, energy that could otherwise be used to build a crust on a steak, and so a dry exterior is the ideal condition for establishing a crust.
For the averagely thick steak, a day of dry brining should suffice, but two days won’t hurt anything. If you have an an extremely thick steak, you can start with a two day dry brine. Really, it’s not a huge deal either way; you just want the steak surface to dry out and the salt to diffuse to the interior of the meat—that’s what you’re waiting for. You should not try to remove the dry brining salt prior to cooking.
Know that salt is not fat soluble, so it will stay on the surface of the fat portions, and that’s fine. And generally speaking, besides salt and sugar, no other rubs will actually absorb into meat. And yes, that includes pepper. You’ll have as much success getting pepper to absorb into a steak as you would have trying to walk through a brick wall. Not to mention, pepper, garlic powder, or whatever other powered adulterant you could add to a steak, will burn during a sear.
If you must add something like black pepper or some sort of garbage steak seasoning powder, add it toward the end of the sear. I like pepper; I have a pepper mill and a favorite black pepper in my gift guide . But if your food is bland without pepper, it’s bland with pepper, and you have bigger problems than pepper.
You may be tempted by a significant other or roommate to skip the dry brine and cook the steak the same day. Do not heed their calls. Good enough is not good enough given the tremendous potential and calorie burden of a great steak. Dry brining is the only path to Making It Great.
Making It Great
For this recipe, the steak is seared hot, butter basted, finished in an oven, and then rested. Start by preheating your oven to 350°F. While the oven is preheating, keep your steak in the fridge—taking meat out to come up to room temperature is at best a waste of time. It takes much longer than you’d expect for the center of the meat to come up to room temperature, and beyond that leaving the meat sitting at room temperature will not do any favors for you trying achieve uniform doneness (if that’s something you’re still chasing), and at worst, you’re risking foodborne illness by leaving meat out for an unsafe amount of time.
Use the time that the oven preheats to take useful steps to prepare for cooking. Mise en place is critical for reducing cooking stress and expanding your capabilities in the kitchen. Get all of the tools you’ll need together: a basting spoon, slotted spatula (also known as a fish spatula), and a spoon rest (or I like using an eighth sheet).
I use The Chef’s Press for a lot of my proteins, including steaks. They’re milled to vent steam out; they’re easy to store, and they’re not terribly heavy for things like burgers either, so I’m a fan. They’re not required for this recipe, but they can help. They’re also great for toasting breads.
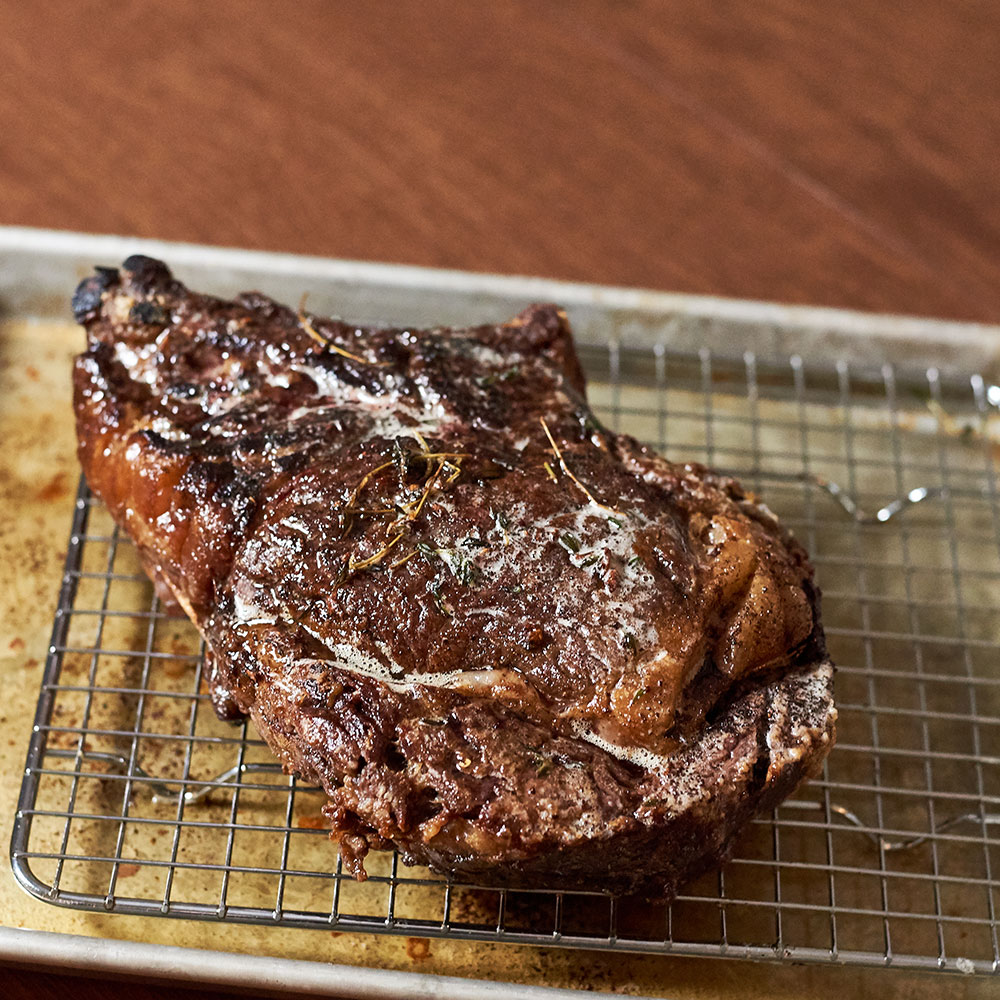
Get a quarter sheet and rack ready. You need a baking sheet on which the steak can finish cooking in the oven. You may be tempted to finish the steak on the pan that you used to sear it, but that’s a really bad idea. The steak will continue to aggressively cook as it finishes in the oven. The rack setup is ideal.
You’ll also want to have a leave-in-theromometer ready. After being burnt by many garbage thermometers, my strong recommendation for probe thermometers is to buy from Thermoworks, or for a leave-in thermometer, specifically a Thermoworks DOT or ChefAlarm, the latter has a low temp alarm, but either will suffice. I like the length of Thermoworks’ smaller probe for something like steaks, which is the stock probe on the Thermoworks DOT, but the longer stock probe on the ChefAlarm is fine. Their instant read thermometers are the best that I’ve used, but they’re not necessary for this recipe.
There’s no way around using a thermometer. The finger test doesn’t tell you anything except for how firm your hand muscles are—they could be pretty flabby, or, with exercise, quite firm.
In addition to a leave-in thermometer, an infrared thermometer (IR thermometer) is also critical for knowing how hot your pan is. I use a cheap one. My cheap IR thermometer calibrated specifically for a dark matte surface (like a seasoned carbon steel or cast iron pan). Fancier IR thermometers have adjustable emissivity, so they can be calibrated to work with a wider variety of pans.
You need a pan. If you’re in the market for a new pan, assuming you have a relatively powerful stove (my 13-year-old piece of junk electric range that came with my house works fine), carbon steel is my suggestion over cast iron, and there’s several recommendations for carbon steel pans in my gift guide . Like cast iron, carbon steel pans are pans that are seasoned, but carbon steel pans are significantly thinner and lighter—they’re quicker to heat up and easier to store, and I much prefer basting food in a carbon steel pan due to their flared sides.
Cast iron pans will work well, though, and if you already have one, you should use that. Cast iron pans generally have a rougher surface than pans made of carbon steel, so cast iron is a bit easier to season than carbon steel. If you only have stainless steel, you can use that, though it’s less conductive than carbon steel, and it won’t be nearly as effective at transferring energy into your food and developing a sear. Additionally, you may have more issues with food sticking to the pan surface when using stainless steel.
I use a tablespoon or two of butter for basting the steak, usually salted butter, but whatever basic butter you have is fine—don’t waste your fancy butter here. Some high-temp cooking oil is needed for your pan, think canola oil, vegetable oil, beef tallow—it’s all fine. If you want to flavor your meat with thyme, grab your thyme. You don’t need thyme, and I don’t use it, but I’ll point out where you’ll use it, if you want it.
Once your oven is preheated, and you’re ready to start cooking, get your pan to about 500°F, as confirmed by an IR thermometer. Be careful not to get your pan much hotter than that. Recall, the cheap IR thermometer that I suggested is tuned for matte black pans, and so you can potentially get a much lower reading from something like a stainless steel pan.
Put some of your high-temperature oil in your pan. Do not put butter in your pan at this point, and no, adding oil to butter does not stop the butter from burning, it only dilutes the milk solids that burn. Oil conducts heat less effectively than your pan does. But contact is king, and so you want just enough oil to increase thermal contact between the steak and the pan. Too much oil in the pan will impede thermal transfer. If there’s not enough oil, and you won’t be able to develop your crust near the bone and other parts of the steak where the steak isn’t flat. There’s a good amount of wiggle room for the right amount of oil, and it’s very much steak dependent. Don’t stress out about it, just use your best judgement.
Make sure the oil is evenly covering the pan before adding the steak to your pan, and tilt the pan slightly if it’s not. Then, add the steak to your pan, straight from the fridge. As you’re putting the steak in the pan, place it away from you, as to not splash oil onto yourself. If you’re using a Chef’s Press, add it on top of the steak once it’s in the pan.
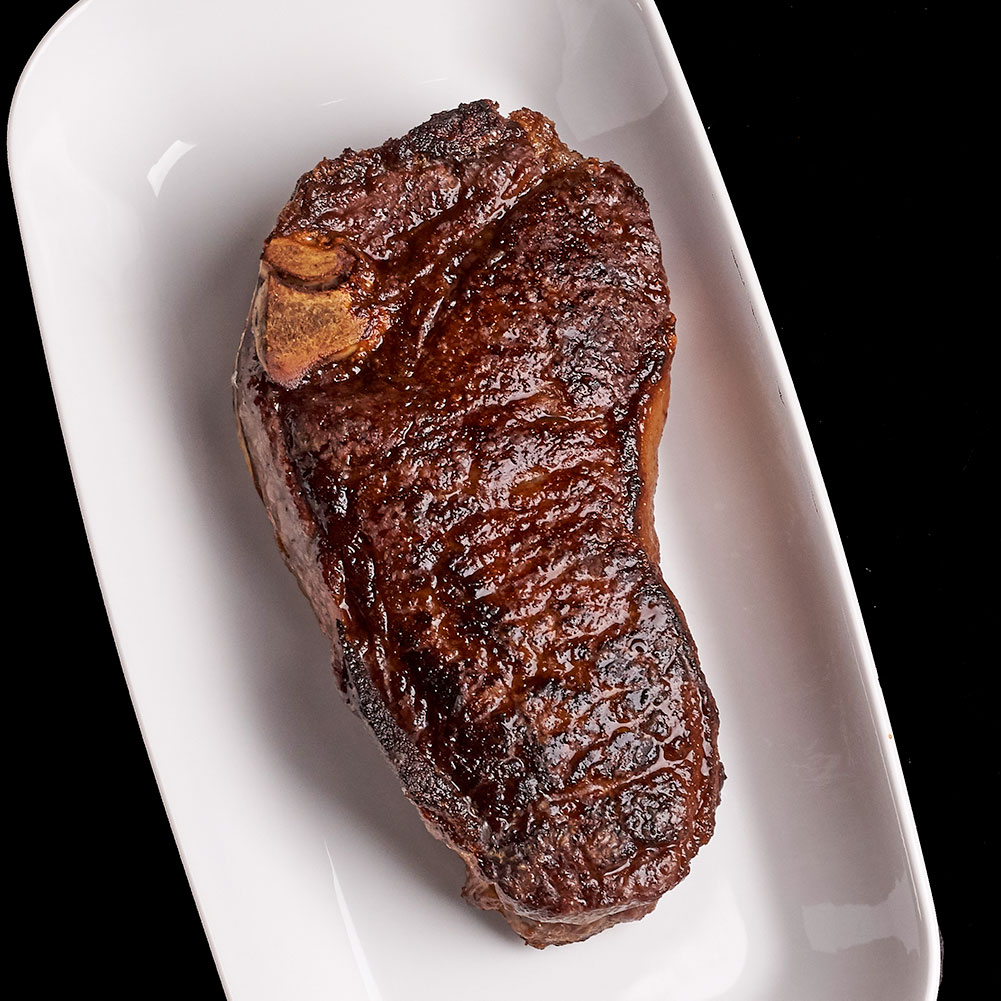
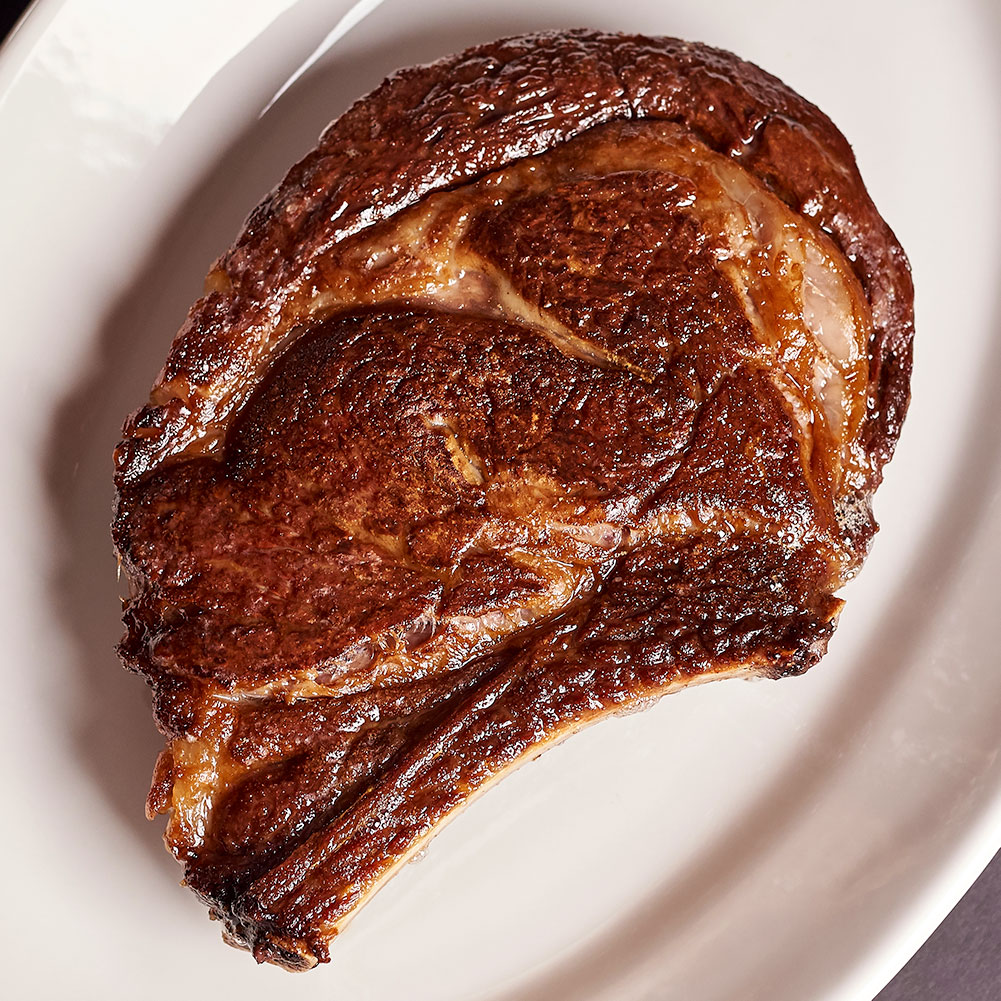
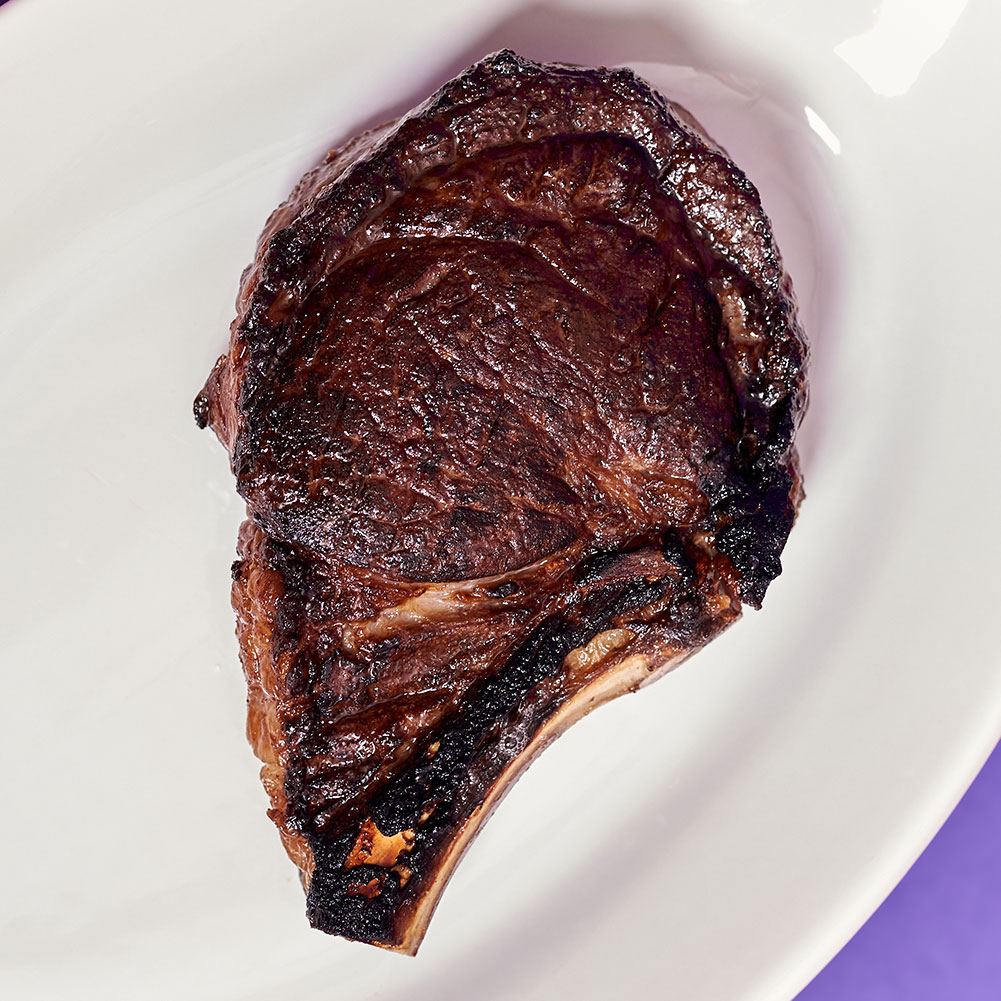
Sear the first side for four minutes. You’re going to sear each side of the steak until it has a decent crust, and I find that four minutes on each side works really well for most reasonably thick steaks.
Once the first side is done, remove the Chef’s Press if you’re using one, and carefully slip the slotted spatula under the seared side of the steak. Take your basting spoon with your other hand to hold the top of the steak. Angle the spatula slightly toward the pan so that you have a sort of scraping motion to cleanly detach the steak from the pan, and lift the steak and flip, carefully so that you don’t splash hot oil.
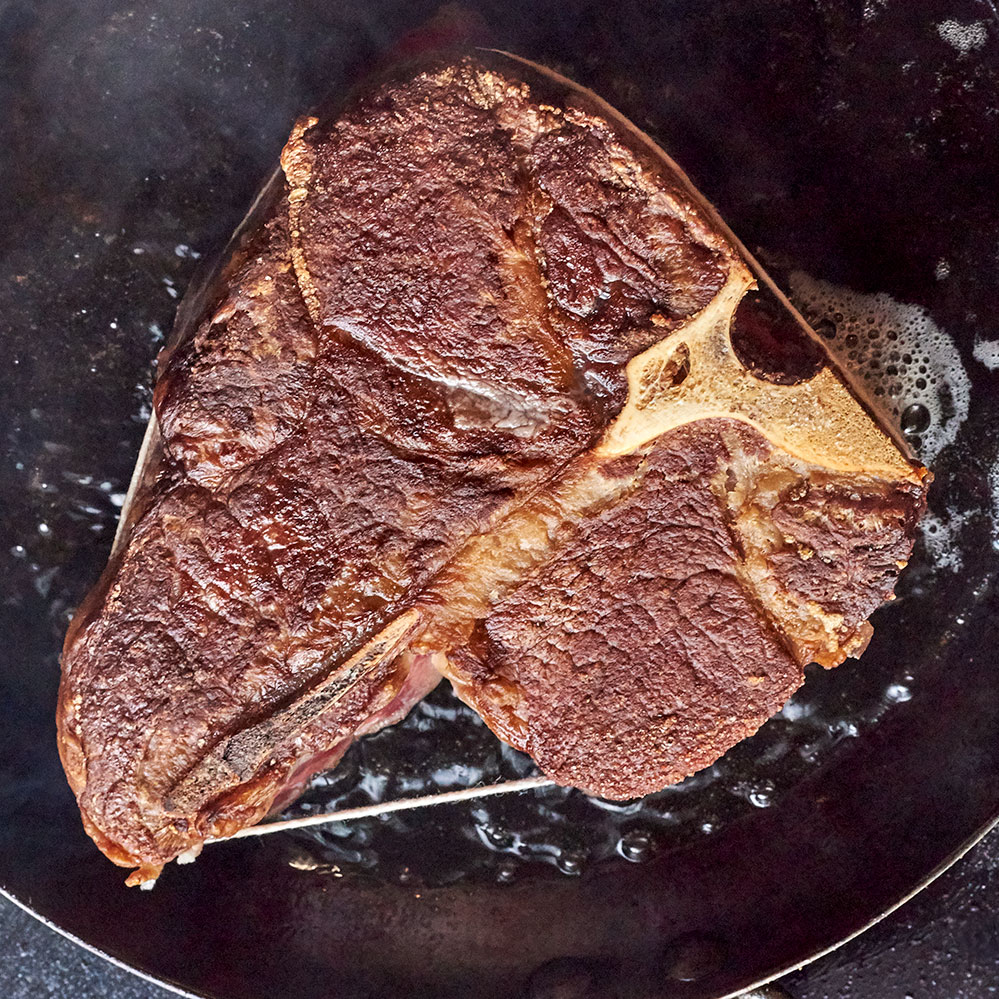
Sear for another four minutes. I usually just throw my Chef’s Press back on and count on the butter basting at the end to sanitize the surface of the meat. If you’re using a press, be your own rabbi here. You can touch the press to your hot pan to sanitize it if that makes you feel better.
In the last 30-45 seconds of the four minute sear, if you have thyme or garlic and want to flavor your steak with that, place them carefully on top of the steak (thyme leaves can contain a lot of water can can pop slightly if they hit the oil). Both absolutely optional, and for a nice dry-aged steak, I don’t usually bother with either. For rib steaks specifically, garlic can sometimes make them seem rib-roasty, which is usually my reasoning for skipping it.
Add the butter to your pan, and tilt your pan slightly toward you, continually baste the steak with the butter. As you baste the steak, the butter should fall back into the pan and circulate on the steak as you keep basting. Basting can help even out uneven patches in the sear. If basting makes you nervous, you can skip it, and it won’t ruin the steak, but it’s a nice touch.
For cuts like the porterhouse, you can spend a little more time basting the strip portion if you want the strip to be slightly more done than the filet mignon portion. Similarly, you can do things like place The Chef’s Press on the strip side of the porterhouse while it cooks, or you can tilt the filet mignon section away from the pan toward the end of the sear on each side if you want to further bias cooking toward the strip side of a porterhouse steak.
Once the steak is done searing, place it on your cooling rack to bake in the oven. Finishing the steak on the rack, rather than the pan in which you seared it, will ensure the steak cooks evenly. If you have thyme, you can leave it on top of the steak if you want, but it doesn’t make a huge difference. Take your leave-in thermometer probe and stick it through the side of the widest part of the steak, and position it at the center of the meat, away from the bone, if there is a bone. If you’ve got a porterhouse, I generally probe the filet mignon portion so it doesn’t have a chance of overcooking.
Set the alarm of your leave-in thermometer to 10°F less than your desired final temperature. I think that there’s generally an optimal temperature for each cut of steak, and I usually set my alarm to 118°F for rib steaks, strips and porterhouses, a few degrees more or less than that won’t ruin anything, but 118°F is a good starting point for the average example of those cuts.
And now you wait while the steak finishes cooking. You can prep your sides at this point, you’ll likely have 20-30 minutes before it’s done, but it really depends on the steak itself. It’s done when the thermometer says it’s done—no sooner, no later.
Once the alarm goes off, remove the steak from the oven, and place the steak and rack somewhere where the steak can rest for about ten minutes, uncovered. It’s fine for the steak to rest on the rack. Depending on the size of the steak, the rest could take more or less than ten minutes, but that’s a good starting point. You can use the thermometer probe as a gauge, as you’re aiming for a specific final temperature (in my case, somewhere in the neighborhood of 128°F).
I’ll say it again: Steak should rest uncovered. The steak will continue to cook, and juices will redistribute throughout the interior, which should help the steak retain moisture. Aluminum foil or any sort of covering will trap steam in and overcook the steak. I’ll go one step further and say that aluminum foil generally is a bad idea for most hot meat—steaks, barbecue, avoid it. The steak will continue to cook as it rests, even uncovered. Do not cover the steak. If a source insists that you cover your steak while it rests, please question their entire body of work.
As the steak is resting, get your cutting board, chef’s knife, and a boning knife ready (if you have one). Prepare a serving platter for the meat, and set your table with forks and steak knives.
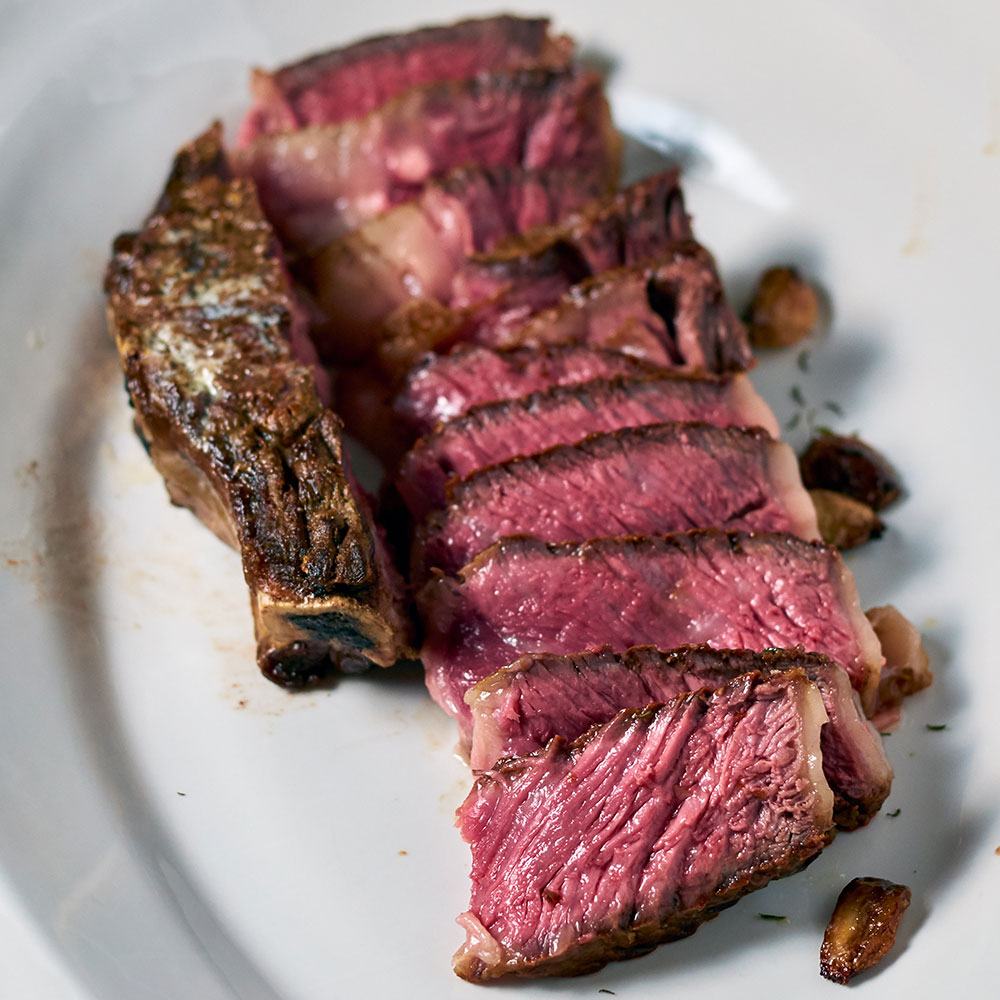
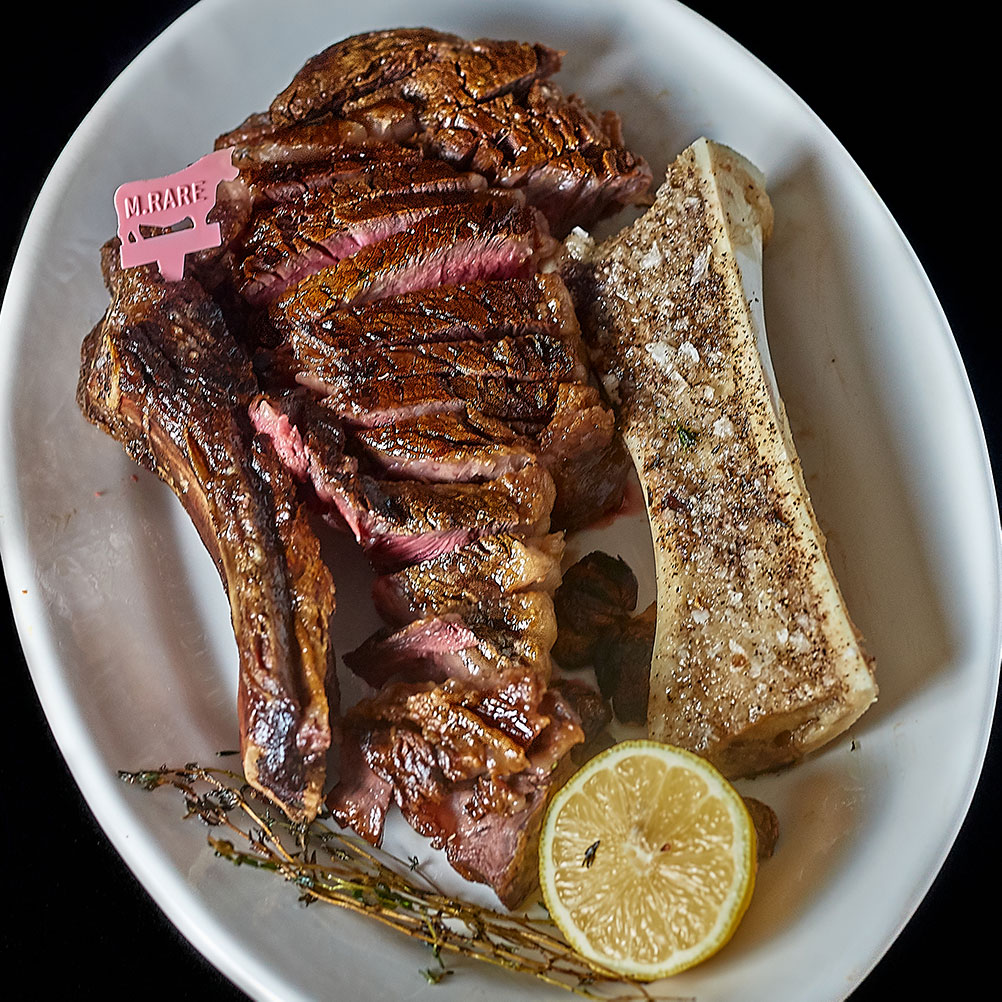
I once told my good friend Ashley that a great steak doesn’t need to be cut by a sharp knife. I aggressively insisted that a great steak should be so tender that it could be cut with a plastic picnic knife. I’m sorry, Ashley—I was wrong, and that’s nonsense. Never be complacent in the quality of your food. Pre-slicing a steak before serving and using steak knives to cut the meat helps mitigate moisture loss, and enables you to present the steak in even cuts that can be easily eaten.
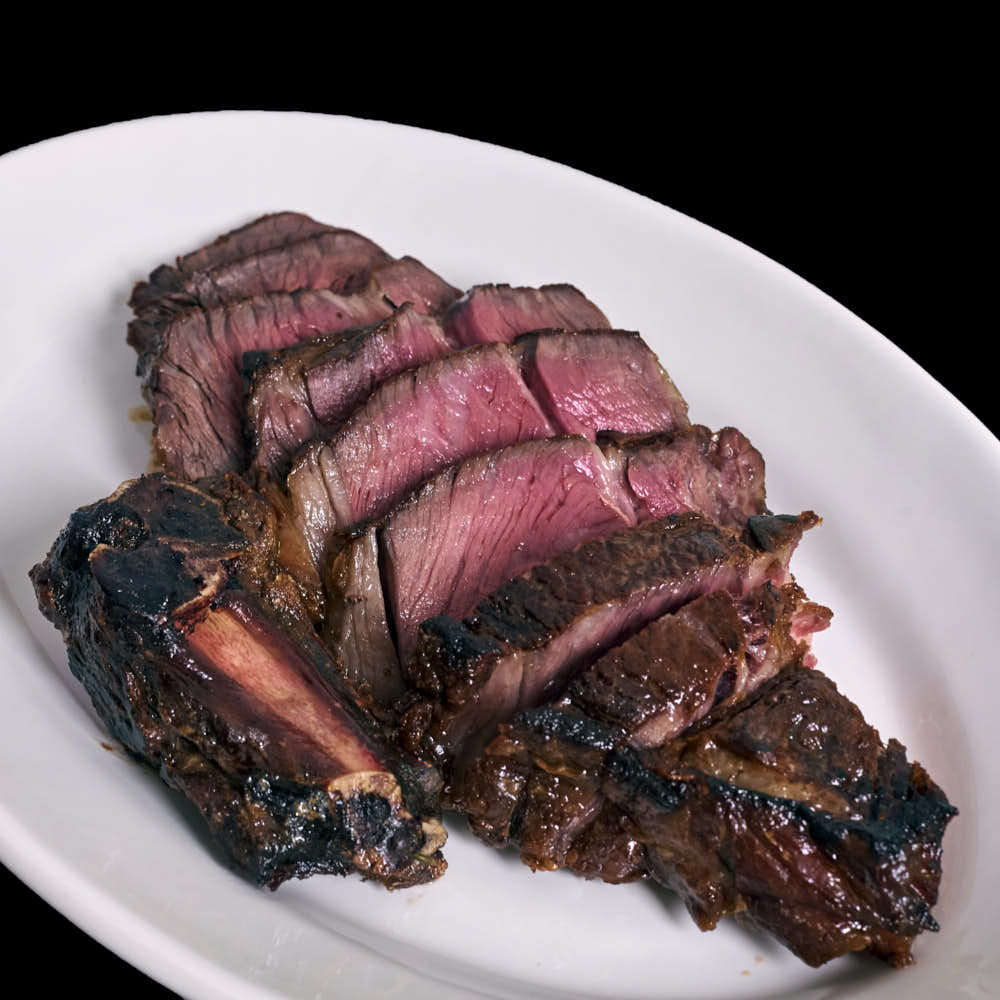
When the steak is done resting, take your boning knife if you have one, or if not just use your chef’s knife. Cut the butcher’s twine. And start to cut the meat away from the bone, keeping the blade very close to the bone (this is why I like a boning knife).
Once the bone is separated from the rest of the steak, place it on your serving platter in whatever manner you find aesthetically appealing. Then, slice your steak. I like doing thin slices, and for cuts like rib steaks, strip steaks and porterhouses, the direction in which you cut doesn’t make much of a difference, and so I generally make my slices width-wise, that is, perpendicular to where the bone would be. Note that for most other cuts of steak, you really want to cut against the grain to maximize tenderness.
Once the steak is sliced, place your knife underneath the cuts, and lift all of them onto the serving platter and slide them off. Thin cuts will cool more quickly than thicker cuts, and so you don’t want to dawdle. I rarely take photos of sliced meat because it just wastes time. Eat your sliced meat, and enjoy it.
Next up in The Secret of My Success

The Latest

A campaign of union busting by restaurateur Ann Kim and a campaign of bullying and intimidation by the Star Tribune to remove my work reporting on the union busting.

Tony Liu and Lindsey Schuyler’s abject failure in reckoning with antisemitism.