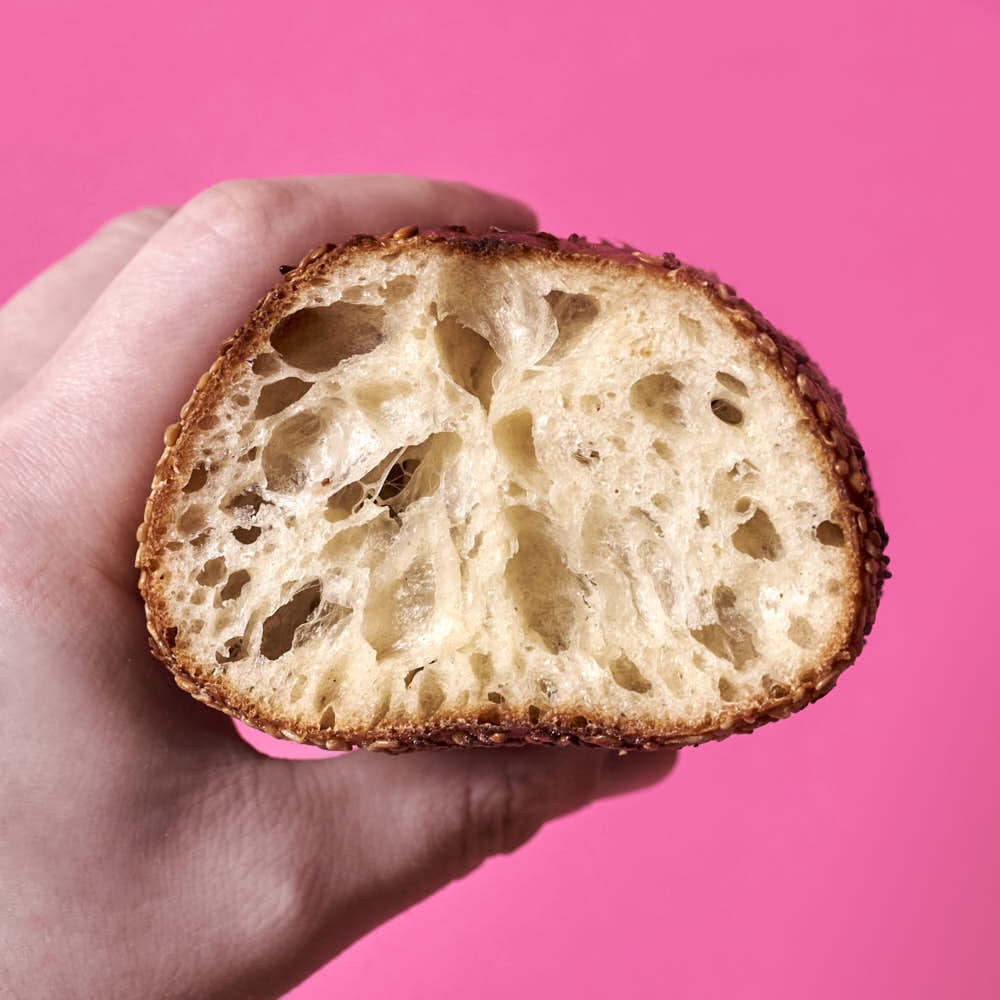
My goal with this recipe was to make a hoagie with a light, crispy exterior and a very soft, fluffy and flavorful interior. You may have different goals for your hoagie rolls, and that’s OK, I’m sure you’ll find happiness elsewhere.
I developed this recipe, in part, because my father-in-law, Bob, loves hoagies, and I needed to make him hoagies. But I also wanted a recipe that someone with limited-to-no bread baking experience could replicate and and not feel a burden in attempting it, so that Bob could bake it himself in his own kitchen when he wants a hoagie.
I find that when I try to do something that isn’t routine, there’s this weight in doing it—it’s like a mental schlep. You can pour all of the dry ingredients together, stir, pour the wet ingredients together, stir, knead until it’s all nearly smooth, and you’ve got the hoagie roll dough made. The dough is reasonably robust against perturbations in temperature and humidity and fermentation time, and you can make a batch of dough and bake rolls throughout the week. It’s flexible.
There’s some basic equipment required, but this is a hoagie roll made to professional standards in your home oven. If you do not want to deal with food scales or a spray bottle of water, you can find a hoagie roll recipe that doesn’t require much of that, and you can bake a hoagie roll on parchment paper with an egg wash. I don’t care—I’m not the one who has to eat that garbage.

Some of my favorite things to make with this roll are roast pork sandwiches and cheesesteaks, and I give instructions for each later in this article. And if you hate sandwiches, I think this is still a flavorful enough dough that you can justify turning the rolls into toasts.
For a toast, cut a roll lengthwise into two disparate pieces—do not ever bisect the roll unless you are making toasts. You can drizzle with some olive oil or maybe Calabrian chili oil and toast in a hot oven or under the broiler briefly. Maybe top with some fresh mozzarella, ricotta, burrata, or some other Italian dairy product that ends with the letter “a”, and don’t forget sea salt.
Equipment
A basic five- or 11-pound scale from OXO works well for measuring flour and water, and you will have much more consistent results using one versus measuring volumetrically, and I do not provide volumetric measurements in this article.
I use a jeweler’s scale for smaller quantities—the recipe specifically calls for 0.1g resolution in measuring a typical four hoagie roll portion of dough. The jeweler scale isn’t strictly necessary, and you could always round to the nearest gram, but I’ve found I don’t really trust the OXO when it comes to measurements less than 5g. If you do purchase a jeweler’s scale, you can use a 500g calibration mass to calibrate it, but it should come pre-calibrated.
equipment
I specify “proofing container” as required equipment. Hoagie rolls just need a large enough container so that the individual 400g balls of dough can rise without sticking to the walls of the container or rising over the top of the container. I use the same proofing container (and optional lid) for both hoagie rolls and pizza.
A steel will more effectively conduct energy into dough than stone, so you’ll see a better rise with steel versus stone, but it’ll be a subtle difference. Use a baking stone if you’ve already got one. If not, Dough Joe sells a reasonably priced steel, which also works well for pizzas. A 1/4-inch or 3/8-inch steel would both work well, and the latter would require a bit less time to recover its heat after baking, which is useful if you’re planning to bake pizzas, too.
You can bake this hoagie roll on a baking sheet in the oven and skip a baking stone or steel, but the bake time for the roll will be longer, and the resulting roll will have a less aggressive rise due to the lack of energy being dumped into the bottom of the dough while baking.
If you’re baking on a stone or steel, you’ll want a peel to launch your hoagie dough into the oven (and also to retrieve it). For hoagie rolls and breads can use a cheap metal one for both launching and retrieving, but a metal peel will be insufficient for launching pizza. In a pinch, you may be able to use an upside down baking sheet or a cookie sheet in lieu of a peel.
I cover the shaped dough as it rises with a tea towel or flour sack towel, and I like rice flour for dusting the towel. If you don’t have rice flour, you can use a light dusting of regular flour instead. Uniformly cover the towel and you can brush the towel with your hand to remove all excess. You can use a baker’s couche instead of a towel, but it’s not necessary for this recipe. I like to use semolina flour for dusting the peel before launching, but you can substitute that with regular flour, too.
Baker of Seville makes a nice lame for scoring dough that enables you to switch between a straight or curved configuration, the latter of which gives a more pronounced ear to the score—I use a straight configuration for hoagie rolls. If you don’t have a lame, a sharp knife will work. Regardless, slashing is critical for letting the dough expand in a controlled manner.
I use a basic plastic bowl scraper to move dough from my mixer to my work station and to remove doughs from their proofing containers. It’s not necessary, but it helps me move dough cleanly, and it’s nice to have. I use a a bench scraper, which is similar to a bowl scraper but much more rigid and vaguely sharp, to cut dough. You can use a knife if you don’t have a bench scraper for that task, and thus I didn’t list it as a required or optional piece of equipment.
A spray bottle works well for keeping an oven and the dough moist, which allows for the best rise and crust quality. You should follow the spray regimen outlined in the end of this recipe. I specifically do not recommend any other methods of introducing water. If you have no spray bottle, you may be able to use a squirt gun filled with water (do not fill with other liquids). A particularly powerful squirt gun may relocate the dough while it cooks, which is unideal. Good luck.
Flour and yeast
I use King Arthur All-Purpose flour for my hoagie rolls, which forms much more gluten than a typical grocery store all-purpose flour. Gold Medal All Trumps bleached flour, Central Milling Artisan Bakers Craft flour, a basic supermarket bleached bread flour, or anything with a similar amount of gluten-forming protein will work well. King Arthur bread flour will get you a roll that has a tough, chewy exterior, the antithesis of what I wanted out of this recipe. Do not use standard supermarket all-purpose flour: it lacks the gluten-forming protein necessary for this recipe.
As far as the yeast goes, this recipe was developed with SAF Instant Yeast. Other instant yeasts (not active dry yeast) will likely work similarly, though I’ve found packet yeast to be relatively unreliable. SAF Instant Yeast works extremely well, and it’s relatively easy to find online or at places like Sur La Table or Restaurant Depot; some supermarkets also may carry it. Once I open a package of yeast, I throw it into a freezer bag and store it in the freezer. You can use it straight from frozen without issue—it’ll warm up quickly enough. If you can’t get SAF Instant Yeast, buy some other “instant yeast” at the store. Instant yeast is not the same as active dry yeast, and I am not recommending the latter.
The Method
The calculator below gives the recipe to 12-inch hoagie rolls, at 400g of dough per hoagie, with an ADV mode is available for alternative hoagie roll sizes. I generally make two-to-four hoagie rolls in a batch, and you can bake them throughout the week to keep them as fresh as possible.
Hoagie Roll Calculator
For kneading and shaping this dough, my preferred work surface is a wood cutting board. If you haven’t oiled your wood cutting board in a while, you ought to oil it with mineral oil, but be sure to wipe it completely clean before working on it with dough. If you follow the instructions of this recipe, the wood board should be a very easy surface on which to work.
Mix the dry ingredients; stir well; add the your choice of olive oil, canola oil, or lard; and add the water. Mix until vaguely together.* Knead by hand until almost smooth or throw into a stand mixer on “stir” for 10 minutes or so until nearly smooth. Do not use bench flour. Bench flour perturbs the recipe—power through it. Use your bench scraper to move the dough if it’s sticky.
*Note on Fat
If you’re using a mixer rather than hand mixing and you want to develop your gluten more quickly, you can wait to add the salt and fat: once the dough is nearly smooth, add the salt, and once it’s fully integrated, add the fat. Witholding the salt and fat is not a necessary step, and it should be noted that it can be kind of messy to add the fat toward the end of the mix when kneading by hand. My pizza article explains the role of salt and various fats in doughs.
If you’re kneading the dough by hand, and the dough is too sticky, once the dough is more or less homogeneous, that is, all of the flour is incorporated, you can invert a bowl over the dough and walk away for fifteen minutes or so. Do not cover the dough with a towel—it’ll stick, and you don’t want moisture to escape at this point. I’ve had very good luck with just walking away from stubborn doughs. If necessary, you can give the dough a quick fold and let it sit for another 15 minutes. Again, do not use bench flour. Do not use bench flour. Power through it.
Remove the dough from your bowl using a bowl scraper, and be sure to remove all of the dough. Place the dough on your working surface. Knead the dough a few times, and then cover the dough with your mixing bowl inverted over the work surface (let’s not needlessly dirty new containers). Wait 30 minutes to an hour (stick closer to latter if your house is cold), and then split into each hoagie-sized portions. Use your bowl or bench scraper to remove the dough from the work surface if it’s a little sticky. Do not use bench flour. Knead each portion briefly, and form a ball.
Place each ball into a lightly oiled container (I generally wipe a very thin layer of canola oil uniformly across the interior with a paper towel). Place the dough in the fridge to ferment for at least one day, and up to four days is optimal†. I’ve kept dough in the fridge for a week, and the resulting hoagie rolls were still great, even if the dough was a little stickier to handle.
†Note on Fermentation
Fermentation will occur more quickly at room temperature than it does in the fridge, and a cold ferment for a few hours will not be sufficient to develop the dough. If you make the dough late at night, you can leave the dough out at room temperature overnight, with each dough ball in a proofing container, and then shape the dough first thing in the morning.
I shape the dough cold straight from the fridge. Previous iterations of this recipe discussed letting the dough warm up prior to shaping, but it’s unnecessary. The cold dough is a bit easier to handle, especially for older doughs, and importantly, it makes it possible to bake a roll for lunch without having to wake up exceedingly early.
Get a tea towel and cover the towel lightly and uniformly with rice flour. Brush away any excess flour, and place the towel aside.
Remove the dough from its proofing container, and place the dough on your bare work surface with the sticky side facing up—the sticky side is the side that was facing down in the proofing container.
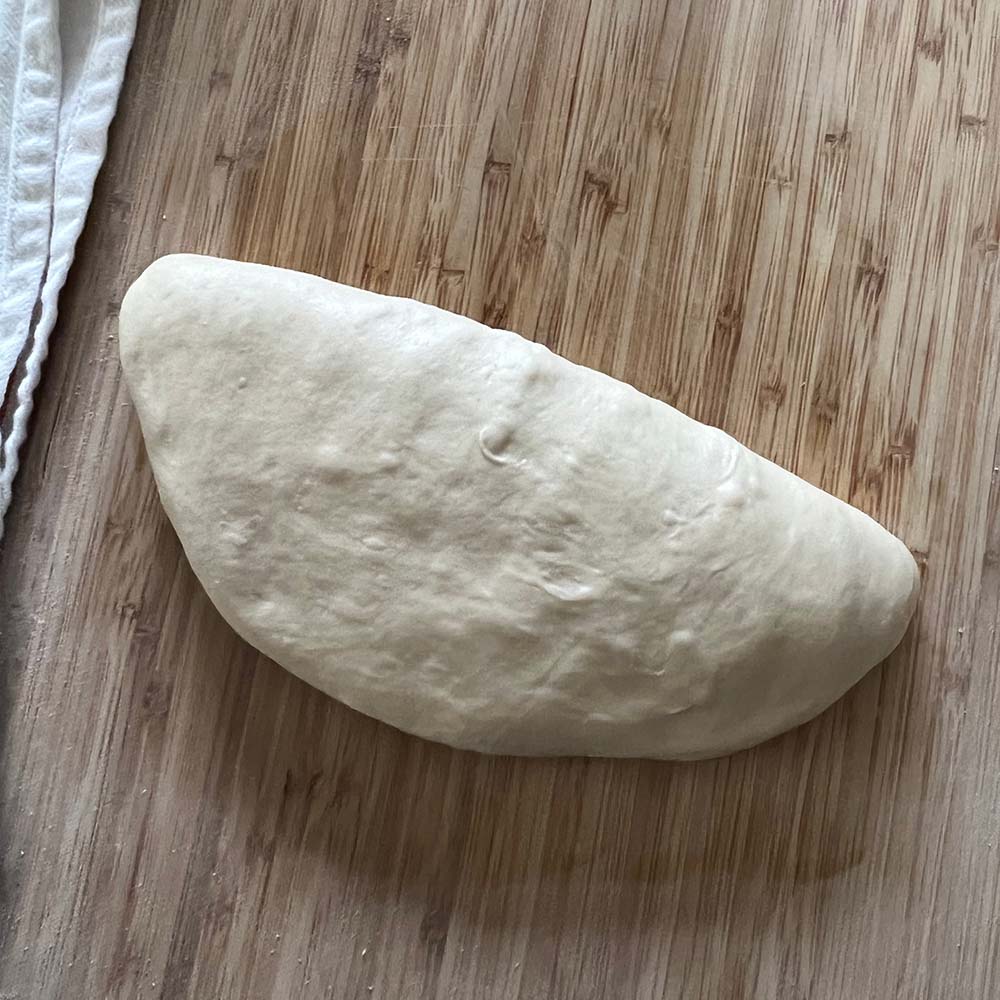
Flatten out the dough with the base of your hand, and then proceed to fold the dough in half by folding the sticky side onto itself. Pinch the seam closed lest the seam imperil your entire hoagie roll once it bakes and has to expand.
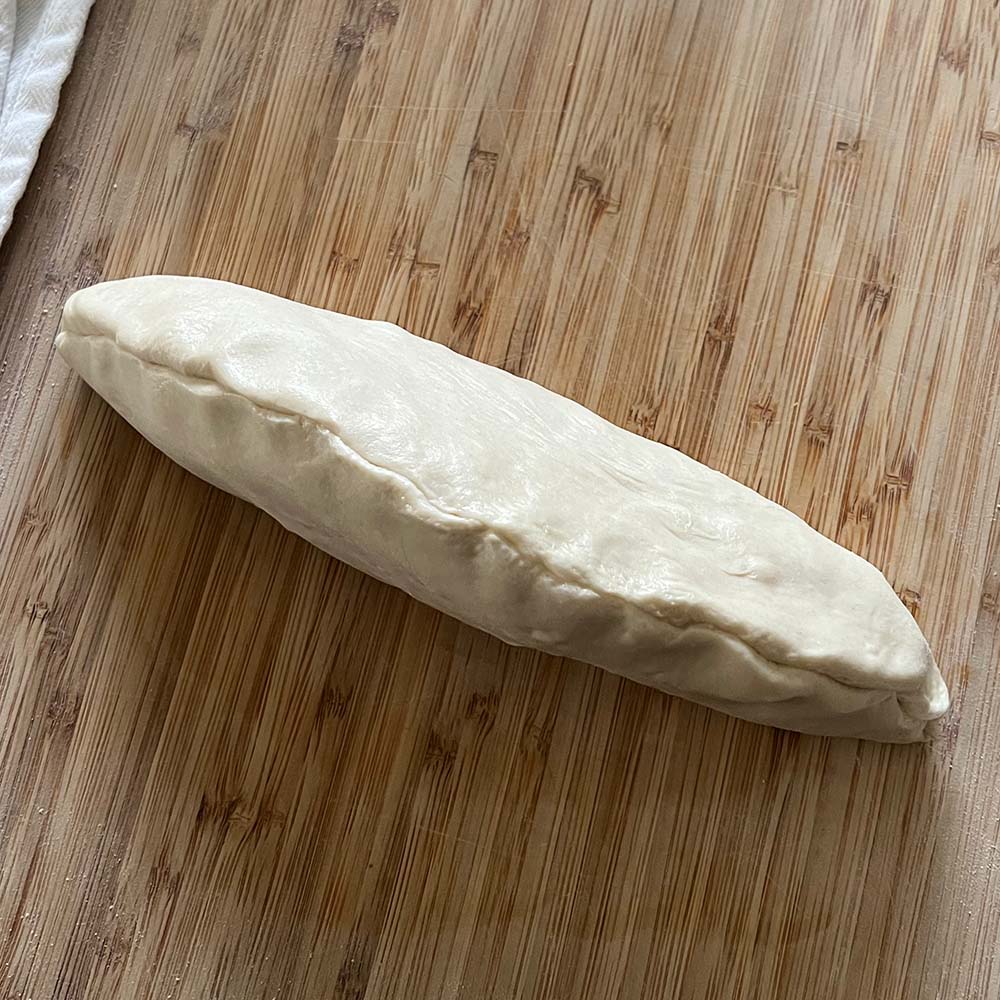
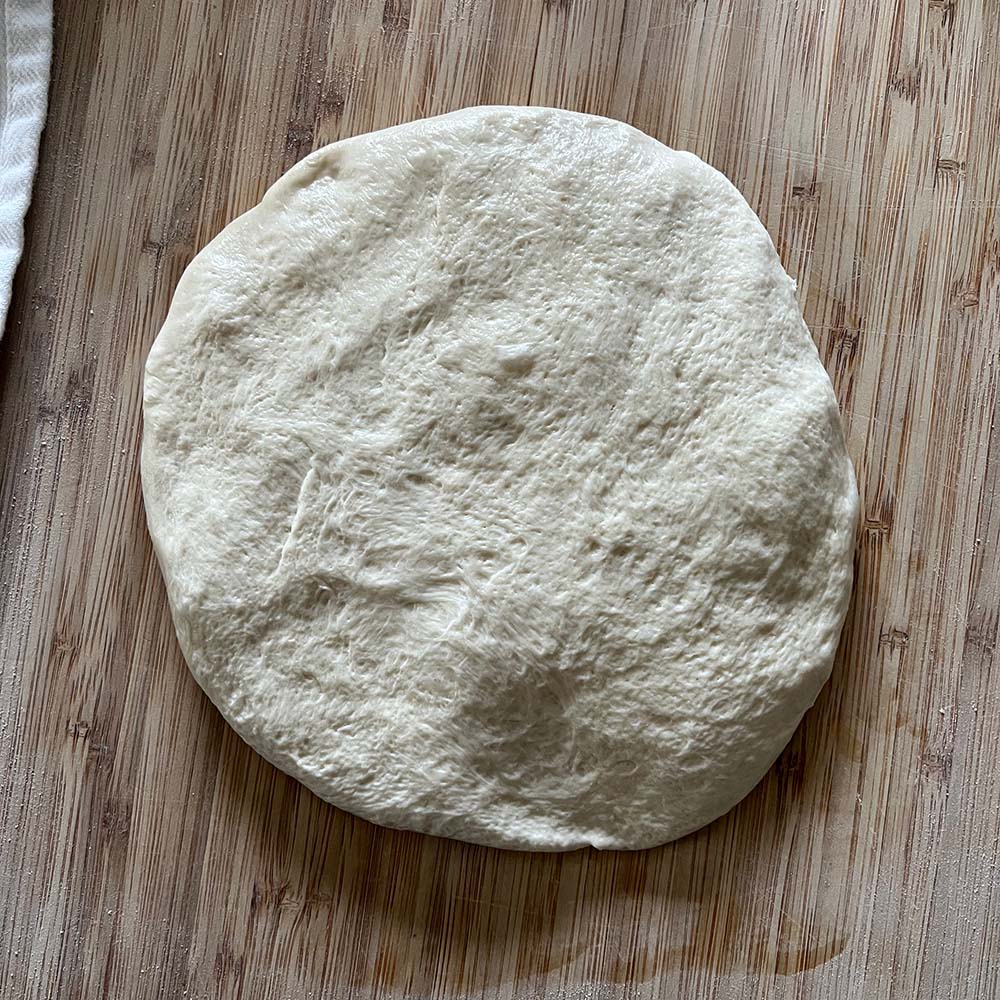
Roll the dough back and forth on your work surface, and pull the dough outward, lengthwise, as you roll, until it reaches 12 inches, or your desired length if you’re doing a different size. If you do a poor job of shaping it, don’t worry: you can re-ball the dough. Wait 15 minutes or so for the gluten to relax somewhat after re-balling, and restart the shaping process. Re-balling is feasible because you did not use bench flour.
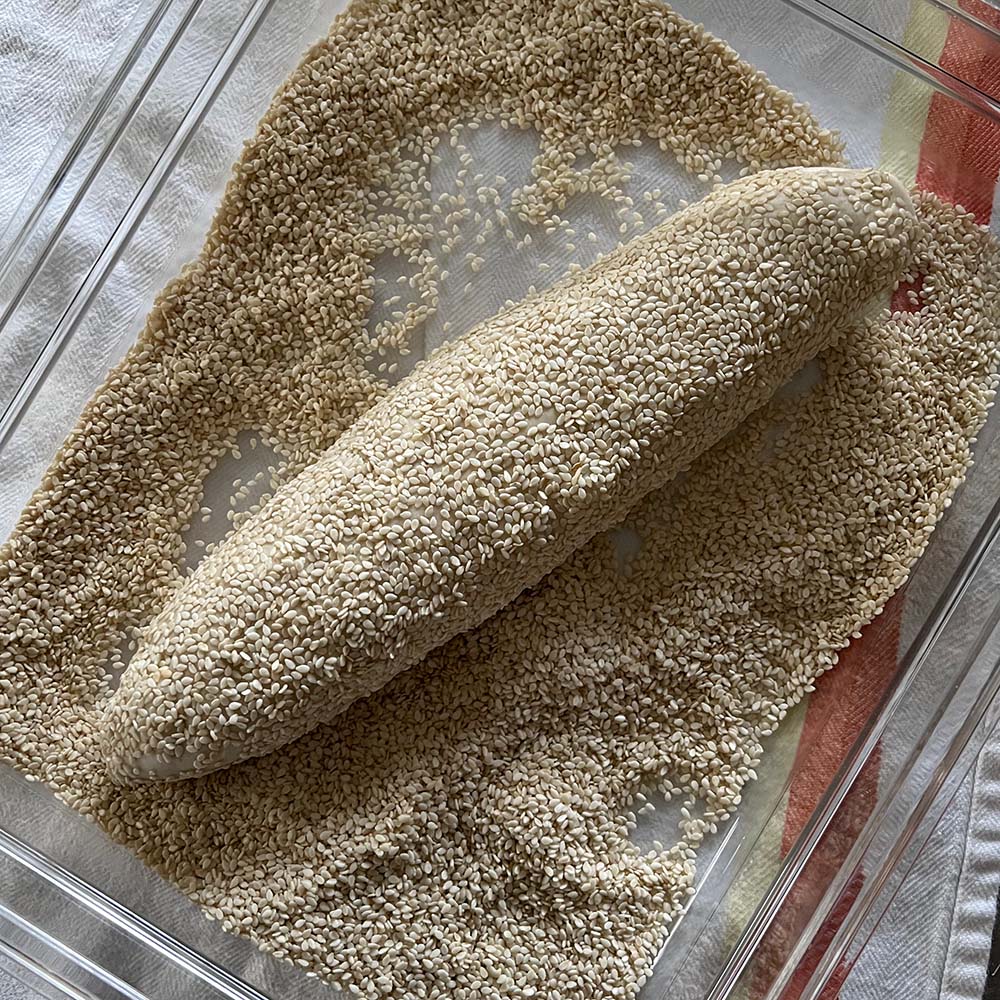
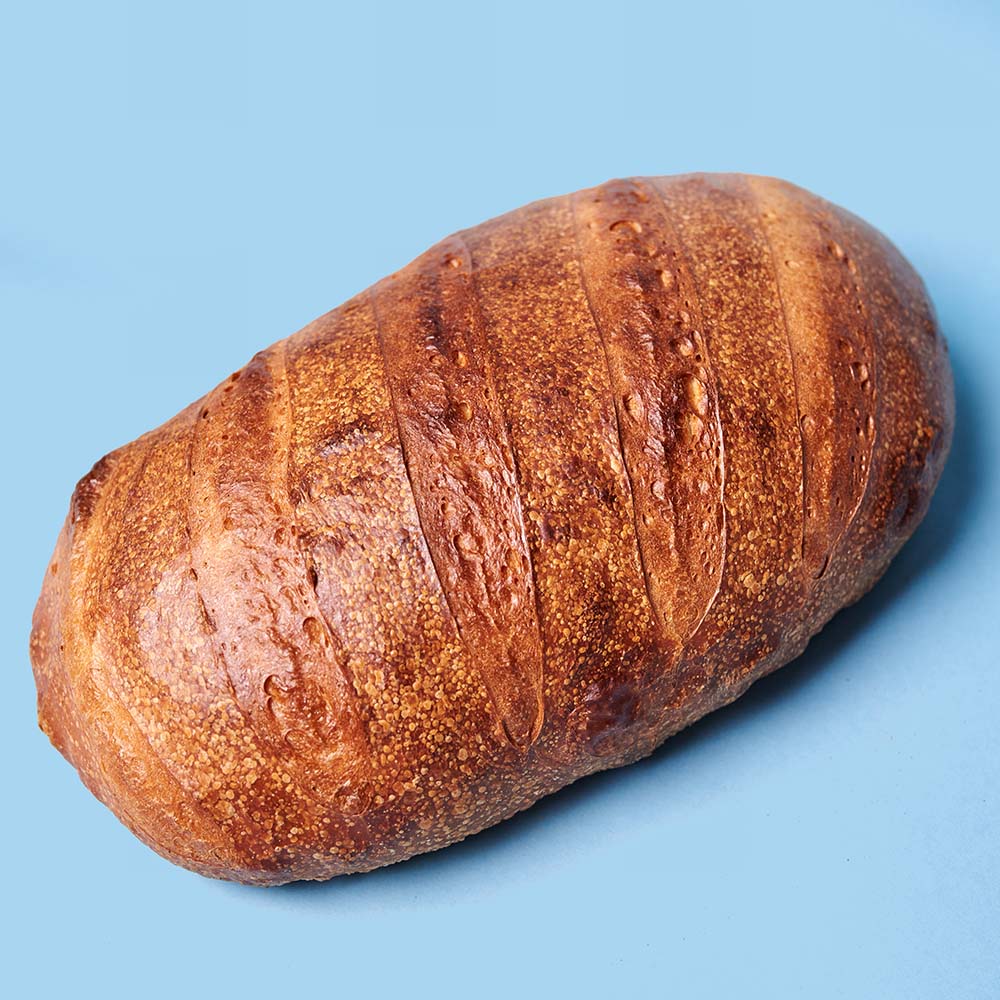
If you want to make your roll seeded, roll the shaped dough in a small baking sheet full of sesame seeds. I cover the entire roll in seeds when I make a seeded roll—the seeds should not burn, so don’t worry about that. If you do not want a seeded roll, proceed, and place the shaped dough on a flour sack towel, and fold over the towel to cover the dough. The hoagie dough will need to rise after it’s shaped for two to three hours.
At this point, I preheat my oven to 500°F on convection bake, but if you don’t have a convection oven, bake at 525°F. I put a stone or steel on the middle rack of the oven, but you can skip the stone at the cost of some volume with your bread and bake on a sheet pan—note that I can’t promise your sheet pan will be able to handle these temperatures. With a stone or steel, you’ll want to preheat an hour to an hour and a half prior to baking. I preheat after I’ve shaped the dough, so I don’t have to worry about hoagies again until I bake.
I prefer to bake one hoagie at a time in a home oven. You can do more than that, but do no more than two at a time. Cover your peel with a light uniform dusting of semolina flour. Carefully roll out the dough from the tea towel onto the peel, and shake the peel back and forth a few times to make sure the dough can move freely. I gently stretch the dough back to size, lengthwise, since the doughs can retract slightly while proofing, but if you’re nervous about handling the dough at this point, you can skip this step without major detriment.
Get your lame ready and dip the blade in water or spray it with your spray bottle. Slash the dough using the corner of the blade: a dough slashed lengthwise will expand width-wise as it rises. Alternatively, you can make diagonal slashes every 2.5 inches, approximately five slashes for a 12-inch roll, to maintain a narrower shape to the roll.
Launch the dough into the oven, and immediately lightly and uniformly spray the surface with water. Set timers for 2.5 minutes and 5 minutes. After each timer, open the oven and spray the roll with water.
Bake until golden brown—around 10–12 minutes. The bake time depends on your oven and your baking surface. In general, if you’re nervous about doneness for a bread, you can test the interior temperature with an instant-read thermometer, and in the range of 200-210°F is a good goal for bread. For this hoagie roll recipe, given the size of the rolls, once it’s golden brown, it’s very likely to be done.
When done, remove the roll from the oven and place it on a cooling rack to cool, if you have one. Otherwise, place it on an inverted small plate, or find some other accommodation for the finished roll that facilitates airflow. Spray the roll lightly with water, which helps develop a sheen on the crust, and wait at least a half hour before cutting into it.
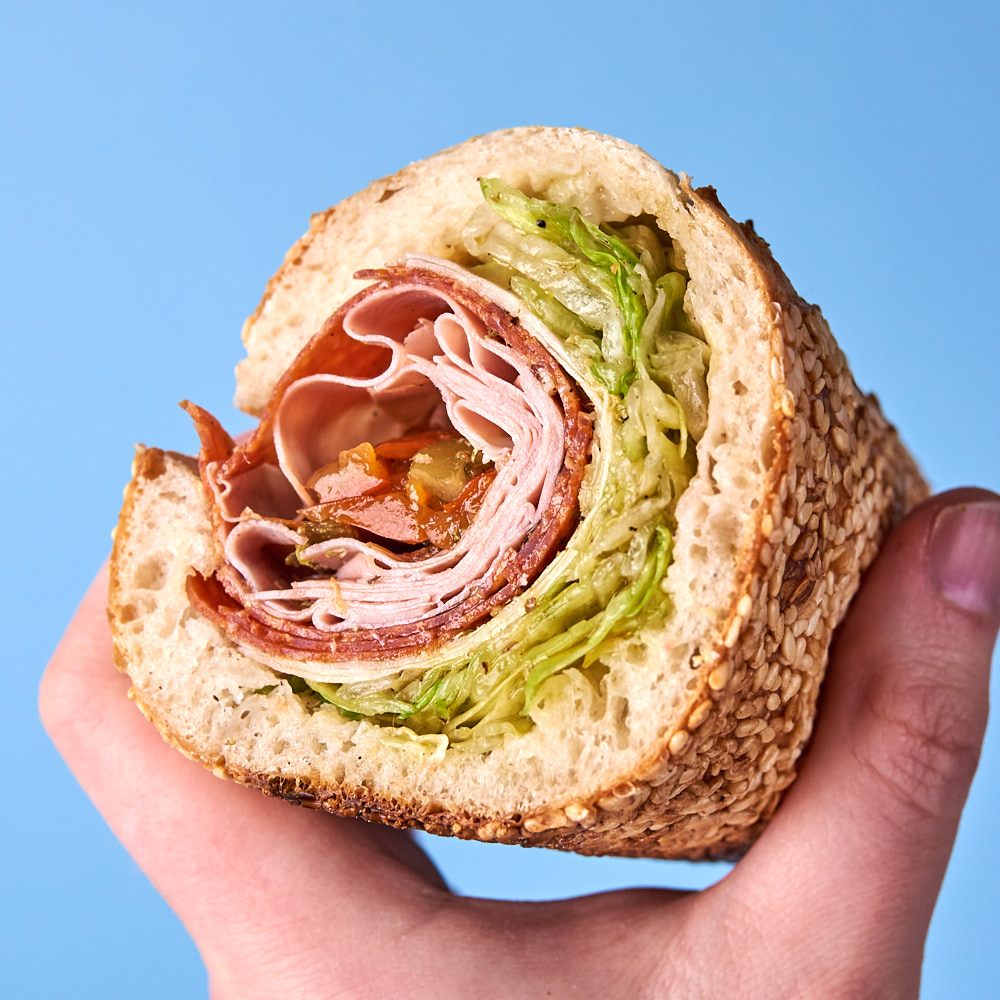
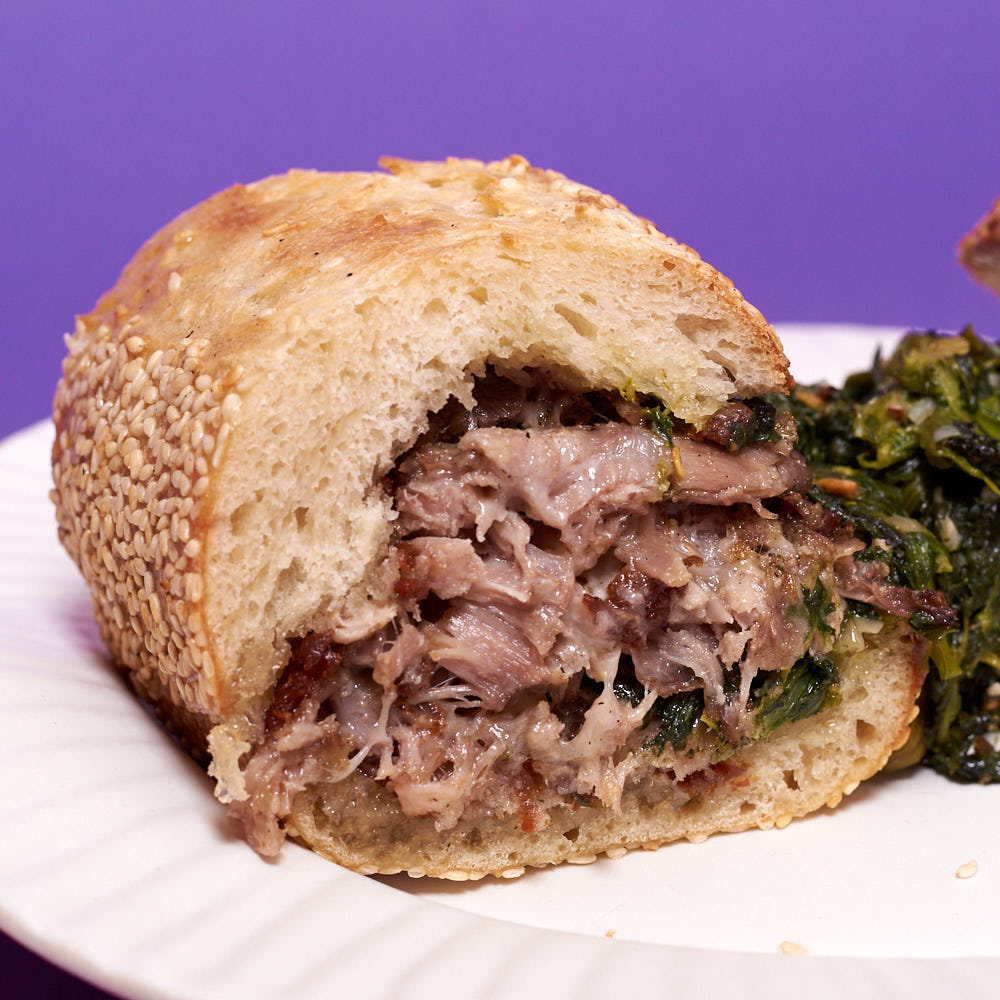
Keep the roll uncut until you’re ready to use it. When ready to serve, cut the roll lengthwise with a good bread knife. I strongly prefer to not bisect the bun: cut almost all the way through, almost like a hot dog bun, rather than cutting the roll into two separate halves, so there’s a sort of hinge on the side of the cut roll. The roll can then be opened, scooped (if you choose to do so) and stuffed. I love the roll, and while it pains me to scoop it, it often makes for a more balanced sandwich, and you can always just eat the innards. If you scoop, scoop with confidence and respect.
Hoagies
I find that it’s best to make a sandwich with fresh bread, and store whatever isn’t eaten immediately in the fridge. Flavors meld as a sandwich sits assembled, and in my experience, the leftover sandwich from the fridge is a better product than a freshly made hoagie with day-old bread.
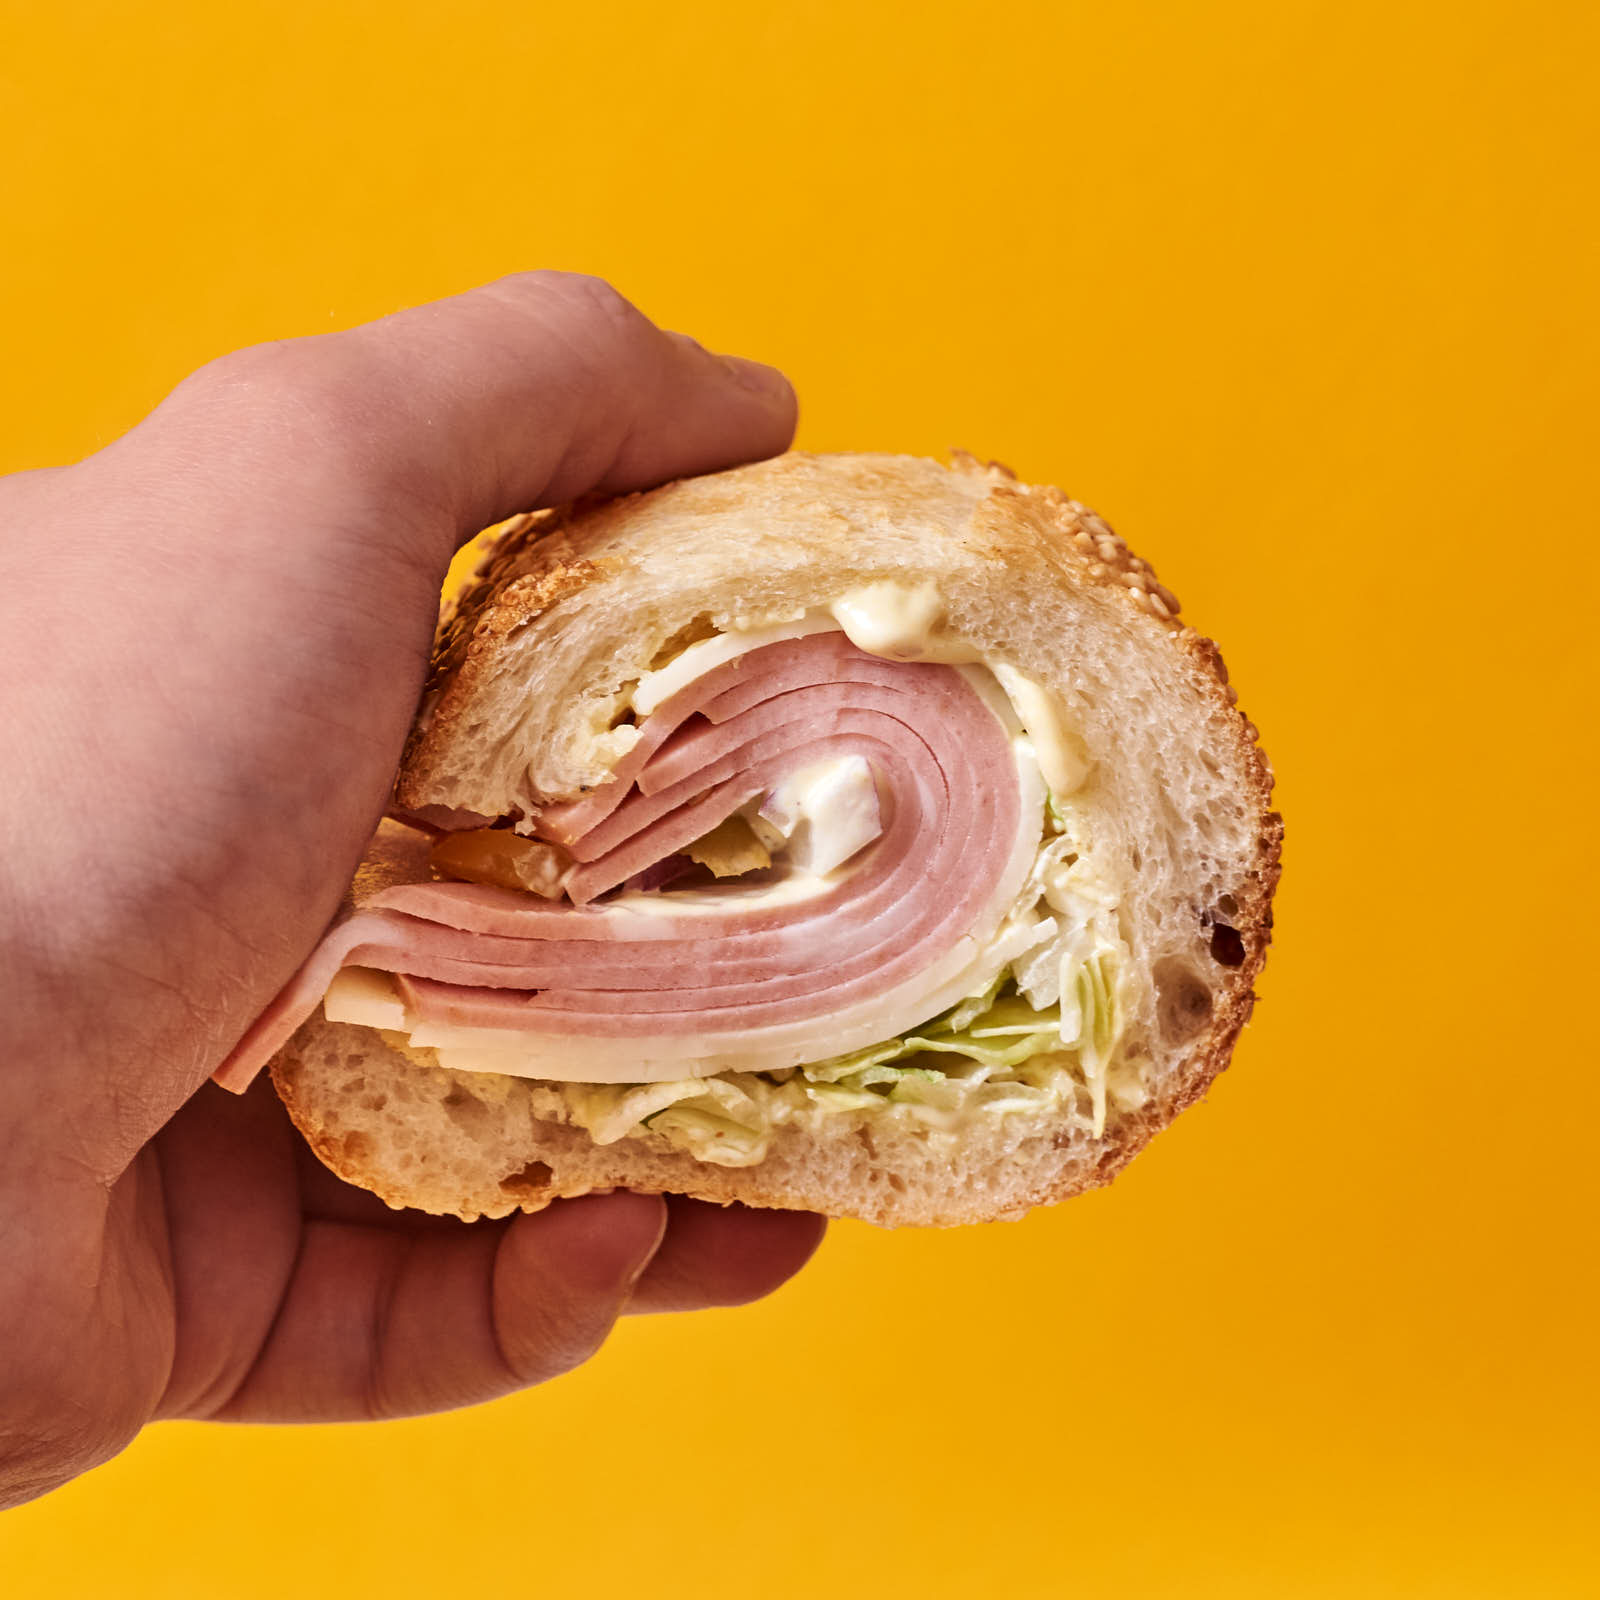
Mortadella is not required on any type of hoagie, but I generally make mine with mortadella and Salumeria Biellese pepperoni. Mortadella is best served thinly sliced, and the thinness of the mortadella slices is significantly more important than the brand. If you have a deli slicer, slice your mortadella as thinly as you possibly can while still maintaining whole slices. If you don’t have a deli slicer, tell the person at your local deli counter to imagine that a demon from hell has cursed them, and that they will forever have to wear glasses with fresh mortadella covering the lenses. Have them slice the mortadella accordingly.
In general, when cooking, every ingredient that isn’t pickled or cured should be salted. The same holds when constructing a hoagie, but it should go a step further: every layer of a hoagie needs to be dressed.
I’ve made hoagies that I’ve enjoyed with dijonaise, a mix of a high-quality dijon and mayonaise. Lately, I’ve taken to making hoagies with a dressing of red wine vinegar, salt, extra-virgin olive oil, oregano, and red pepper, and black pepper, and that’s become my preference. Regardless of which path you choose, dress every layer of your sandwich.
I make all of my hoages with shredded iceberg lettuce. Even if I use dijonaise as the dressing for a hoagie, I still dress the lettuce with olive oil and vinegar: I start by tossing shredded lettuce with olive oil first, and after that I add oregano, red pepper, and black pepper, followed by red wine vinegar and salt. There’s claims that, in general, lettuce will wilt when dressed with oil due to its lipid polymer cuticle. While this has been tested, in my experience, iceberg lettuce is robust against fatty threats, and I’ve noticed no detriment to the lettuce when using the aforementioned dressing regimen. Be your own rabbi.
I slice my hoagie roll just before it’s time to assemble the sandwich. Again, do not bisect the roll into two halves—it’s significantly more convenient to eat with the roll hinged. Beyond that, bisected rolls have bad aesthetics. I scoop the roll to better the resulting sandwich, and then if dressing with dijonaise, I spread it on the inside of the roll.
Once you start assembling the sandwich—I won’t dare tell you which order to put the ingredients—apply dressing after each layer of an ingredient type: put down cheese, add the dressing; put down pepperoni, add the dressing; put down mortadella, add the dressing. Stick with the pattern.
I believe hoagies must have some sort of pepper, and while I have a banana pepper that I love, I’ve had good success with chopped cherry peppers, too, including Cento’s diced hot cherry pepper hoagie spread.
Roast Pork Sandwiches
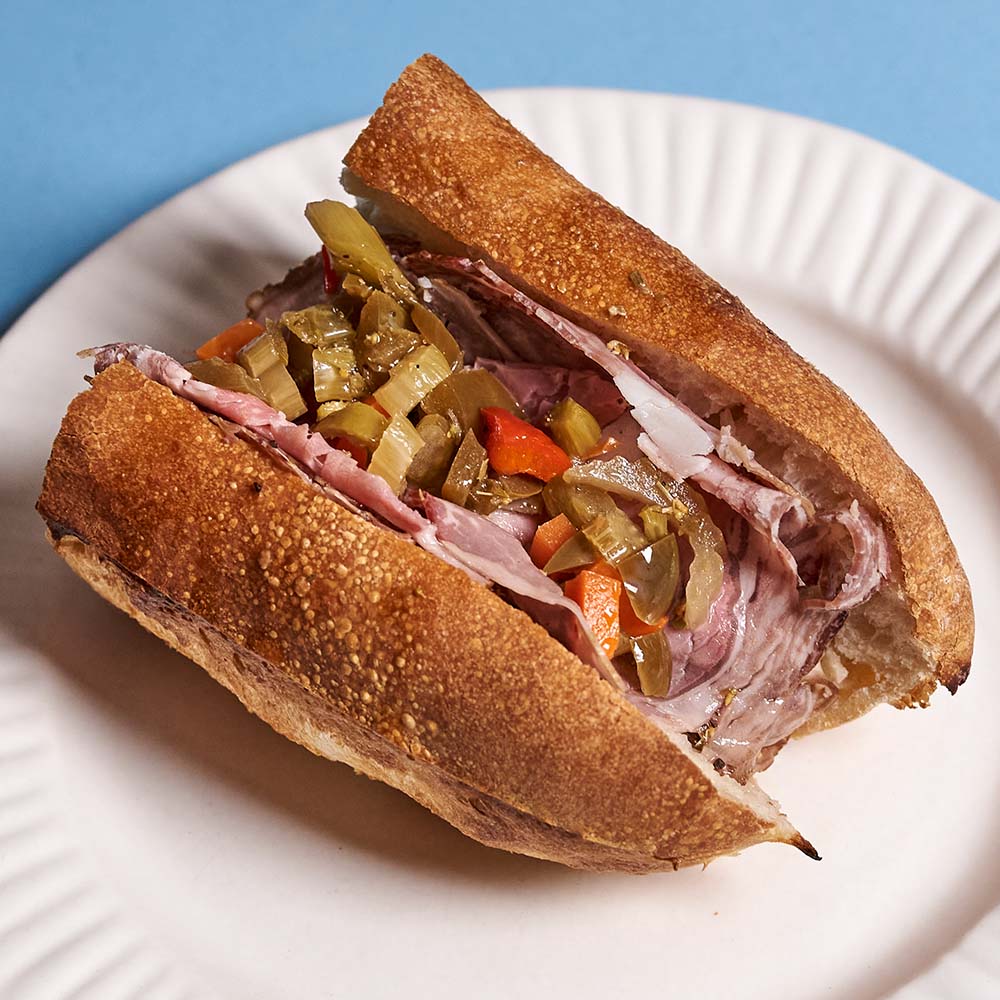
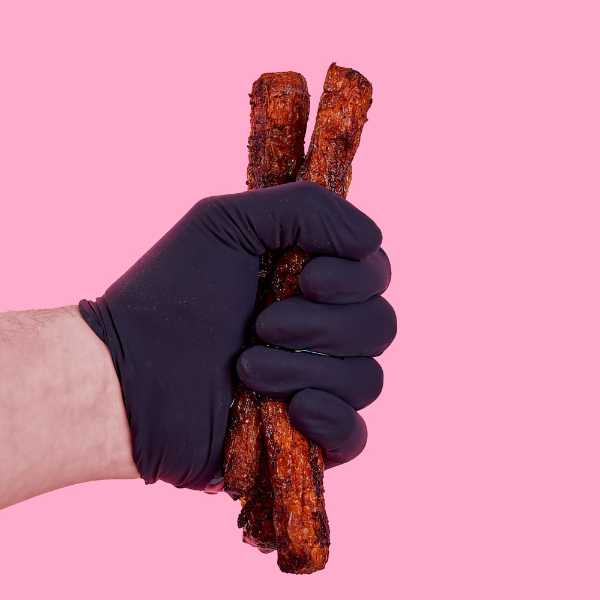
One of my favorite things to make with my hoagie roll is a play on the roast pork sandwich—pork butt confit, broccoli rabe, and sharp provolone.
You can cook the pork on your stove-top in lard (induction cook tops can be useful for something like this) or sous-vide, but you don’t really need an exact right cook temperature for something like this. You need to cook the pork to the point that you’ve broken the collagen down into gelatin. The clear marker that indicates doneness for pork butt, or any other high-collagen cut, like beef brisket or chuck is jiggles. If the meat jiggles like Jell-O throughout, you’ve broken down the collagen sufficiently.
When I make it, I cook the pork in lard on an induction cooktop for around 22 hours at 165°F. I recycle the lard every time and freeze it in between batches to continually build up flavor a la carnitas. Serious Eats has done an analysis of pork consistency at various temperatures and times for sous-vide, and that can give you some sense of what you’re in for at each temperature.
Once the meat is cooked, wait for it to cool entirely. You can then parse the pork into individual servings and freeze what you won’t be making immediately. It freezes extremely well, just defrost in the fridge the day before you plan to serve it.
When ready to serve, slice your provolone. I generally blanch a lot of broccoli rabe and freeze it in single portions, and it freezes well. I chop up the blanched broccoli rabe well and sauté in olive oil with some salt, minced garlic, and red pepper.
For the pork, roughly pull it, and fry up in oil . I try to keep the pieces I fry large enough that the meat remains juicy on a pan fry. You should also salt the meat well at this point—it’s an extremely fatty cut, and you’ll need salt to make that fat taste like much of anything. Throw the slices of provolone on the pork toward the end of the cook.
The result is essentially carnitas meets a roast pork sandwich. And truth be told, as a Jew that can’t justify having all that much pork on hand, I use the same pork precursor for these roast pork-like sandwiches and carnitas both, but if you know you only want the pork for sandwiches, feel free to add the likes of oregano, fennel, and rosemary to the pork during the initial cook.
Slice the role lengthwise, and be careful to not ever fully bisect the role into two pieces.
Do not store breads or pizza in the fridge. Leave uncut hoagie rolls that won’t be eaten within a few hours of baking wrapped in a tea towel or butcher paper at room temperature for a day or two. For breads that aren't freshly baked, reheat the roll at 350°F for 15-20 minutes before serving. Freeze baked rolls that won't be eaten within a couple days. You can defrost a roll by leaving it out at at room temperature for a couple of hours. Reheat before serving.
If you choose to make cheesesteaks, I will not hold your hand through it, but I will offer some advice.
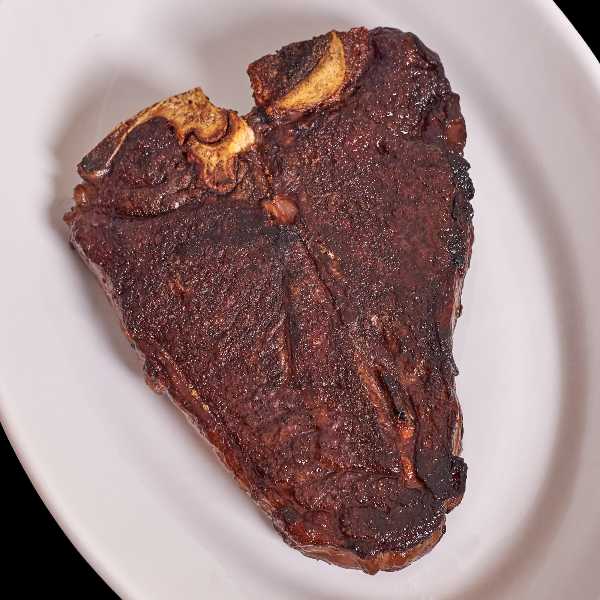
Cheesesteaks are best when made with ribeye. Eye of round is essentially garbage, and if the steak isn’t good enough to eat as a steak, it’s not good enough to eat as a cheesesteak. High-end USDA Choice or basic USDA Prime will do well for a cheesesteak.
The grain of ribeye goes vertically through the face of the steak, and for optimal tenderness, cheesesteak meat is sliced on a deli slicer, and each slice is made across the face of the ribeye steak. You can slice ribeye by hand, but you won’t be able to make those cuts across the face of the steak. If you decide to slice by hand, be careful, use a very sharp knife, and try freezing the steak for 30-45 minutes prior to slicing.
I dry brine my ribeye for cheesesteaks, but if not, salt the beef when it’s nearly done cooking so that you don’t draw out all of the moisture while it cooks.
Once the beef is nearly done cooking, top with your cheese of choice. Once the cheese is melted sufficiently, grab your prepared roll, open it and place it it cut-side down over the beef and cheese, and take your spatula and place it under the beef to help plop it into the roll.
Bread Loaves
I’ve had success scaling this recipe up into bread doughs, but the following bread loaf instructions have not been as thoroughly tested as the hoagie roll instructions, and if you proceed, you are doing so in acknowledgement of this fact. You are beta testing.
You can turn the hoagie roll dough into a freeform loaf. Scale the dough up to 1400g. If you’re using the hoagie roll dough calculator, 1400g is the equivalent of 3.5 hoagie rolls. I more or less shape the loaves the same way as I do the hoagie rolls. At 12”, it will be loaf sized. Let the shaped dough rest for three hours or so after shaping.
You’ll want to set your oven lower than with hoagie rolls—450°F (or 425°F with convection). When it’s time to bake, make five width-wise slashes across the loaf with a wetted lame, and spray the loaf before launching into the oven.
Spray into the oven, and then continue spraying at five minute intervals until the dough has reached its maximal volume, about 15 minutes. If your oven loses its steam readily, spray every 2.5 minutes for the first 7.5 minutes.
Once the loaf has reached maximal volume, rotate the loaf so that the back becomes the front, and turn your oven temperature down to 350°F. Spray one last time. Ignore the following unless you’re baking on a commercial deck oven: if you’re baking on a commercial deck oven, you’ll want to have started the bake with the vents closed, and open the vents after 20 minutes.
If you’re baking on stone, you should be fine leaving the bread on the stone, but if you’re using a steel, you’ll likely end up baking the bottom of the bread too much if you leave it on the steel the entire time—throw the bread onto a cooling rack before returning it to the oven.
The bread is done once the interior temperature hits 200-210°F, about 40-45 minutes of total cook time. When the bread is done, spray the loaf with water to help develop a shiny crust. Rest the bread on a cooling rack for at least a half hour before slicing it. If the bread cools completely before slicing it, throw it into a 350°F oven for 25-30 minutes, and it’ll be as good as fresh.
Next up in The Secret of My Success

The Latest

Tony Liu and Lindsey Schuyler’s abject failure in reckoning with antisemitism.